The right lawn garden edging idea depends on whether you want the border to disappear or to read as part of the design. Metal strips sit nearly flush and let plants dominate; Corten steel and stone blocks declare themselves and shape the bed’s character. Cost spreads from zero for a hand-cut trench to roughly $15–20 per linear foot for poured concrete curbing, with most homeowners landing between the two extremes. The condition that changes everything is maintenance tolerance: living borders need patience and seasonal upkeep, while stone outlasts decades but asks for heavy lifting on day one. Even dried bamboo, cheap at the hardware store, turns silvery gray within two winters unless you choose the species deliberately.
1. Trench Edging
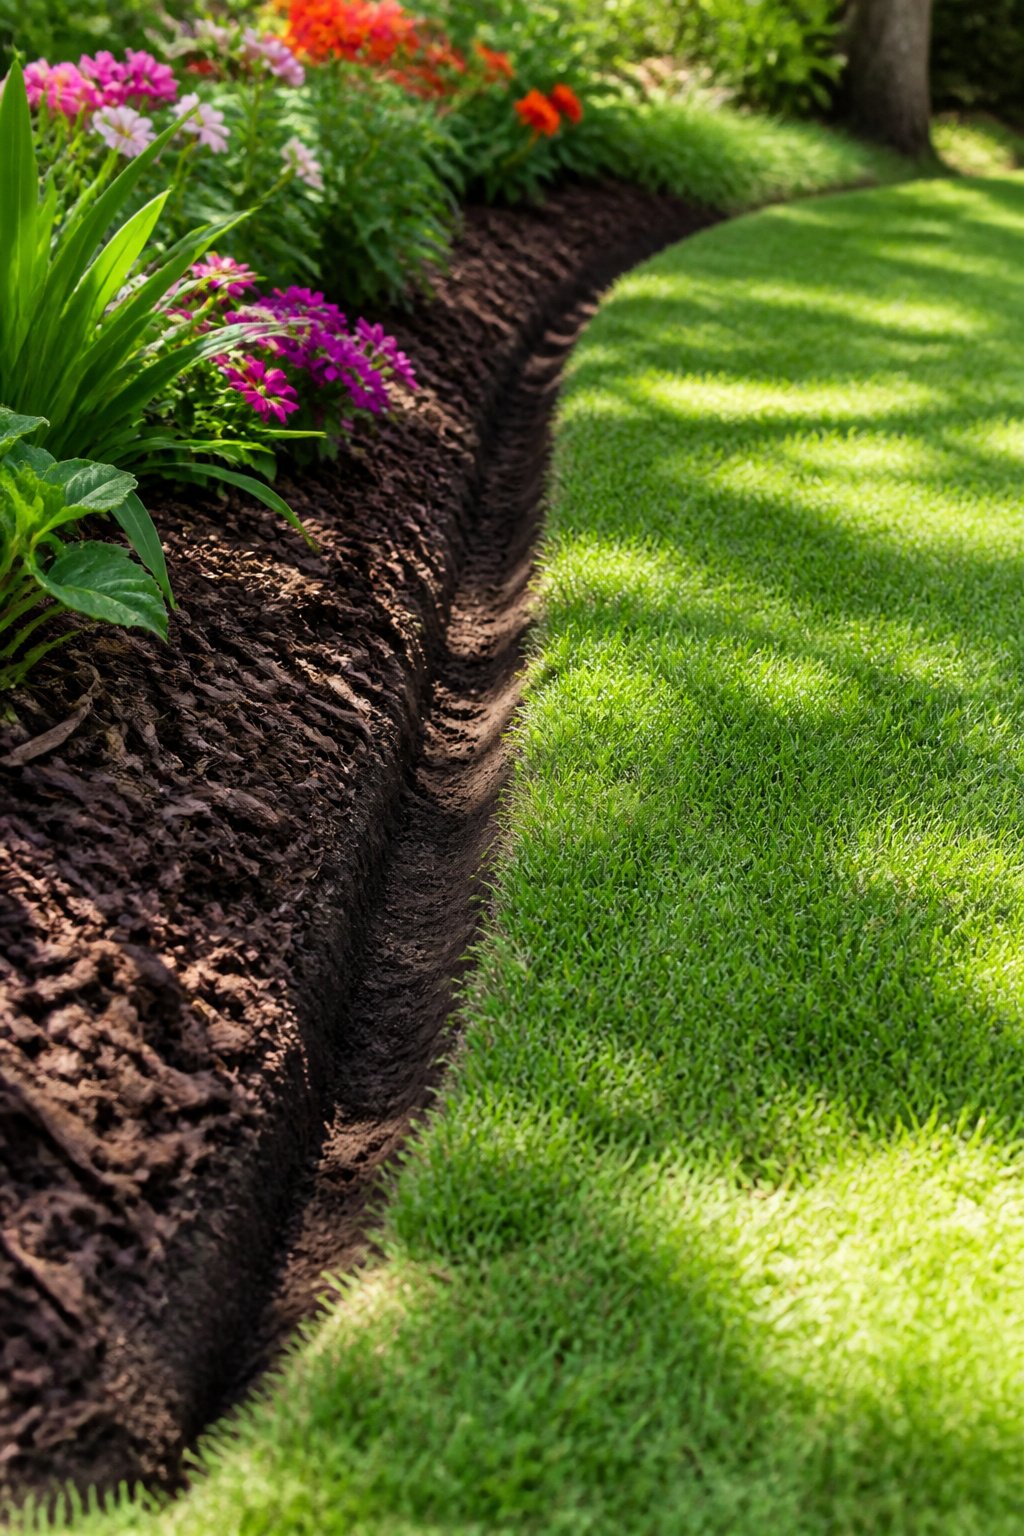
A clean trench cut with a flat-edged spade or half-moon edger gives the sharpest no-cost line between lawn and bed. Cut straight down about four inches along the border, then angle back toward the bed to create a small channel. The result looks surprisingly polished for zero dollars spent.
Grass creeps back in within a few weeks without a physical barrier, so the edge softens fast. Re-cutting a few times per season keeps it crisp. This method works best when the bed sits slightly higher than the lawn and is filled with mulch; the natural dip at the edge makes the trench easier to maintain and the line easier to see.
The tradeoff is time for money. If your budget is tight and you do not mind the upkeep, this is the simplest lawn garden edging idea to start with.
2. Brick Edging
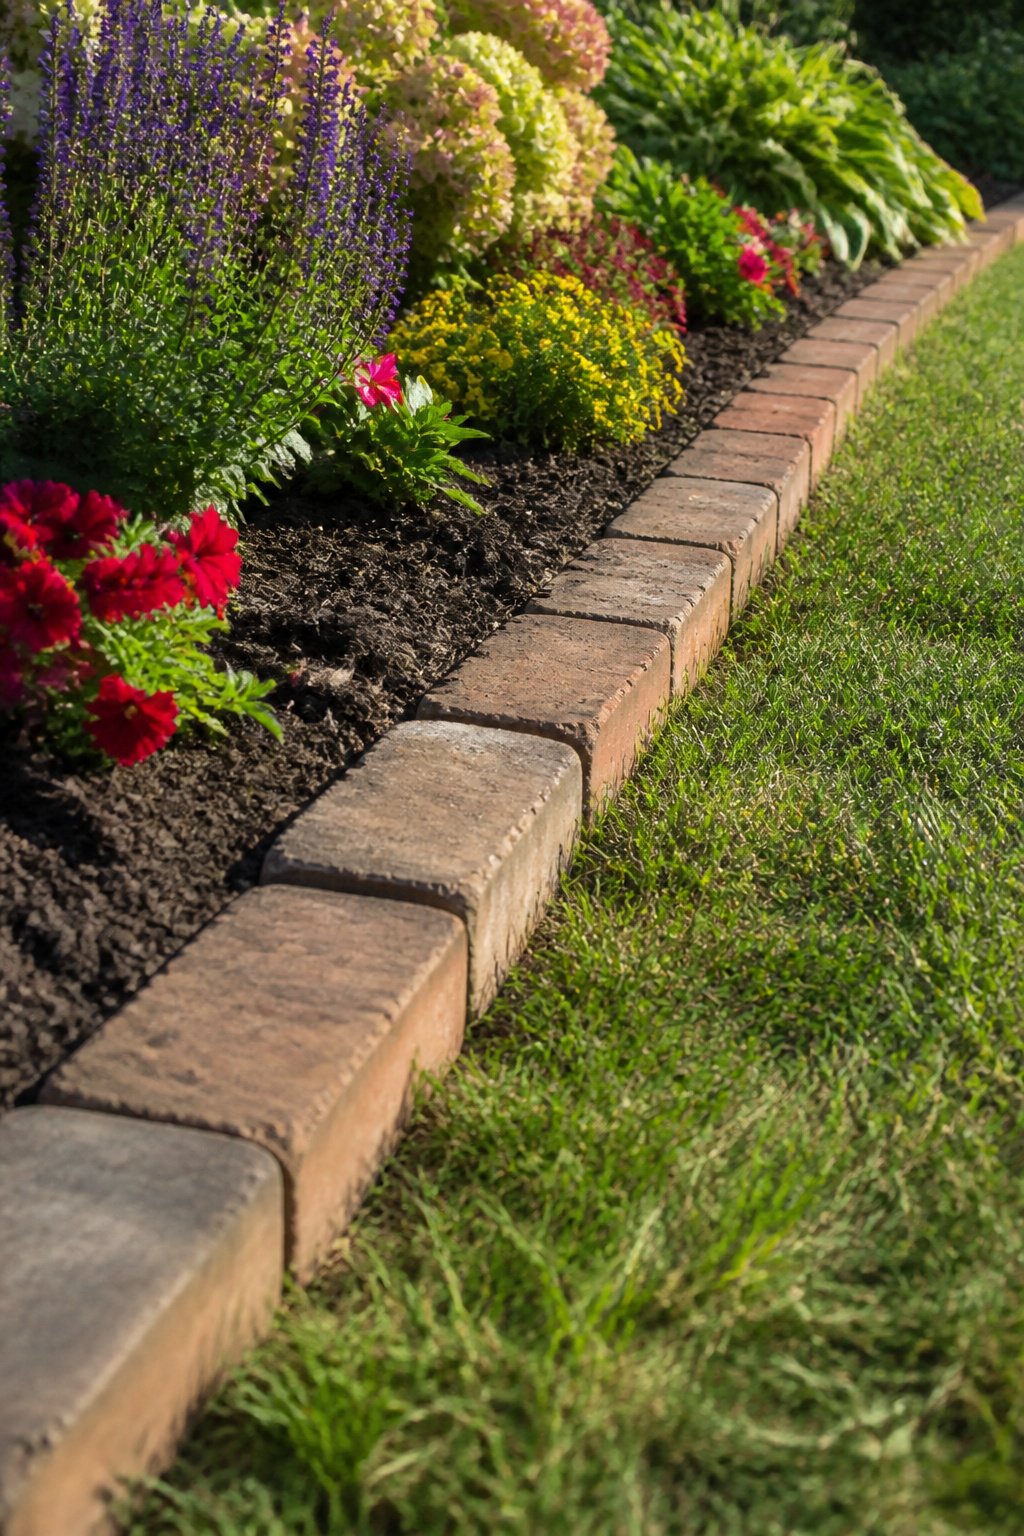
Brick edging is the one material that kept showing up in every source I read through, and after weighing the options, I get why. A shallow trench, a layer of sand for leveling, and the bricks sit where you put them. Laid flat, they make a clean, low-profile border that your mower can ride right over; stood on end or angled, they give the bed more presence.
Reclaimed bricks from salvage yards or demolition sites cost less than new and carry a weathered surface that looks like it belongs in a garden rather than fresh from the factory. In hot, dry regions, they pair naturally with gravel and pavers for xeriscape designs. Freeze-thaw cycles do not phase them, and the line stays crisp for years without replacement. The uniform finish reads as deliberate; the heritage look of salvaged brick reads as found. Both work, and the choice is mostly a question of what the rest of your yard is already saying.
3. Natural Stone Edging
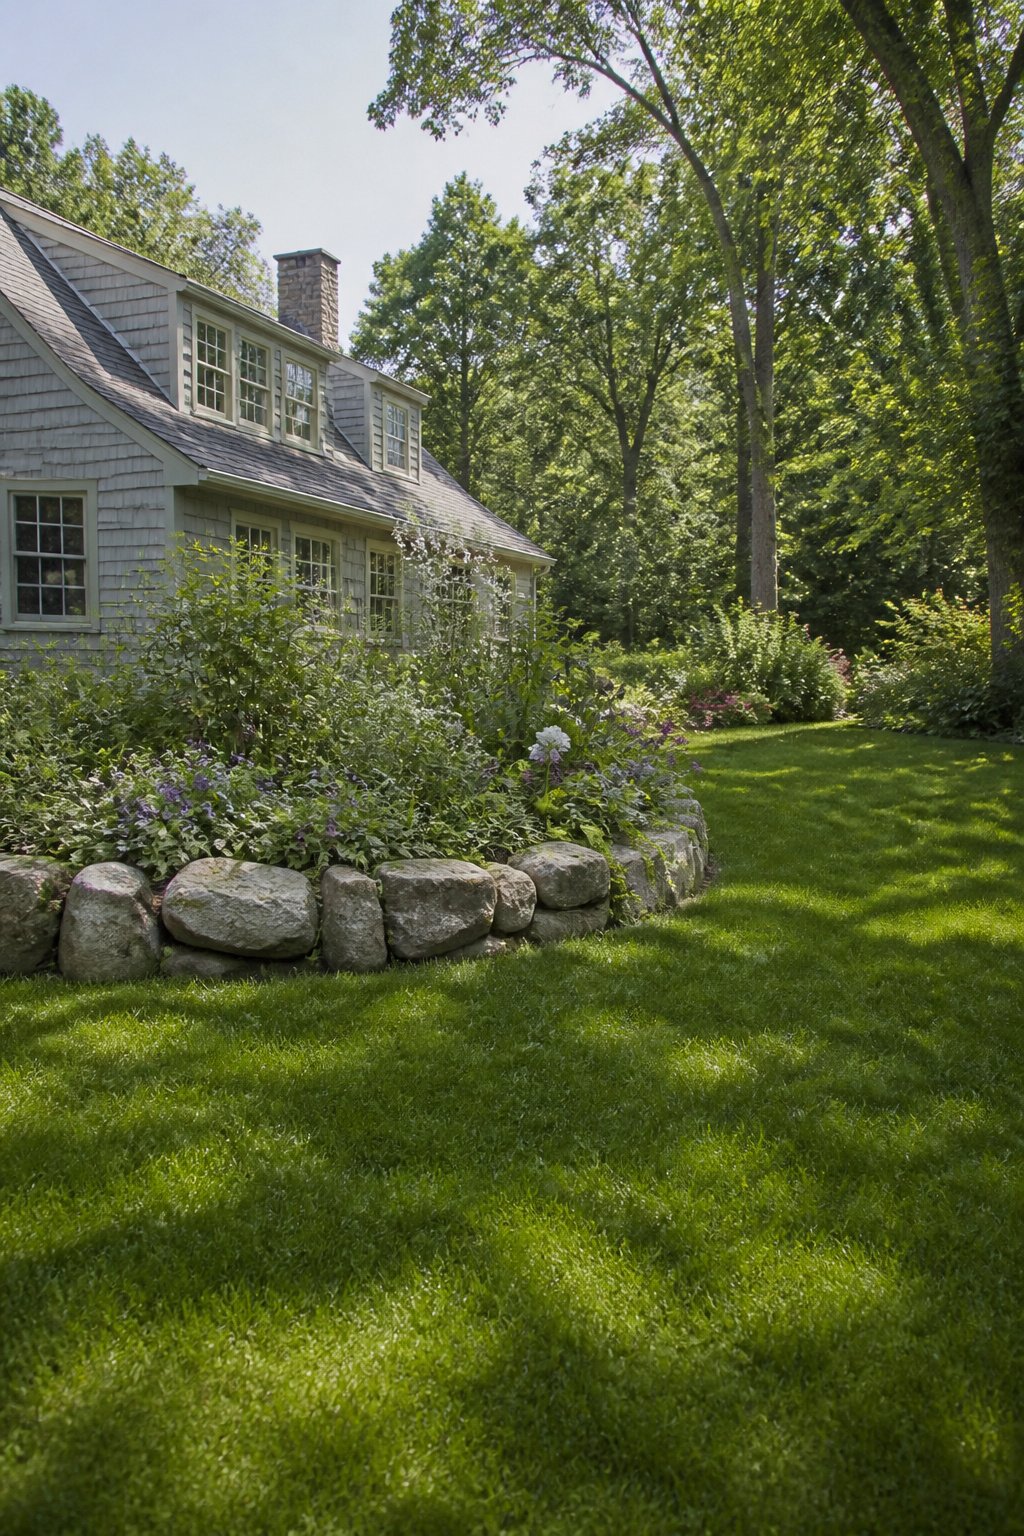
Field stones or cut stone both settle into a garden like they grew there. The rough, irregular shapes read informal, almost accidental, which suits cottage beds and layered plantings where nothing lines up. Dressed stone, squared and leveled, pulls tighter and reads more formal against clipped edges or a straight walk. Either way, the weight is real: a single limestone block can run sixty pounds, and a twenty-foot bed edge adds up fast. The payoff comes later. Set properly, stone outlasts every other material in this list. Decades, not seasons. No rotting, no warping, no sun-crackle.
Larger, flatter stones stay put better than small round ones, which want to roll with frost heave or a misplaced foot. I press them into the soil rather than mortar them; the garden shifts, and rigid joints crack. A sunk stone can be levered up and reset. A mortared wall, once it goes, goes altogether.
Cost runs low if you have access to a field or a friend’s farm pile. Landscape yards sell by the ton, and delivery hurts less than your back will after hand-loading. Collecting yourself keeps the price down but burns the weekend.
4. Gravel or Pebble Border
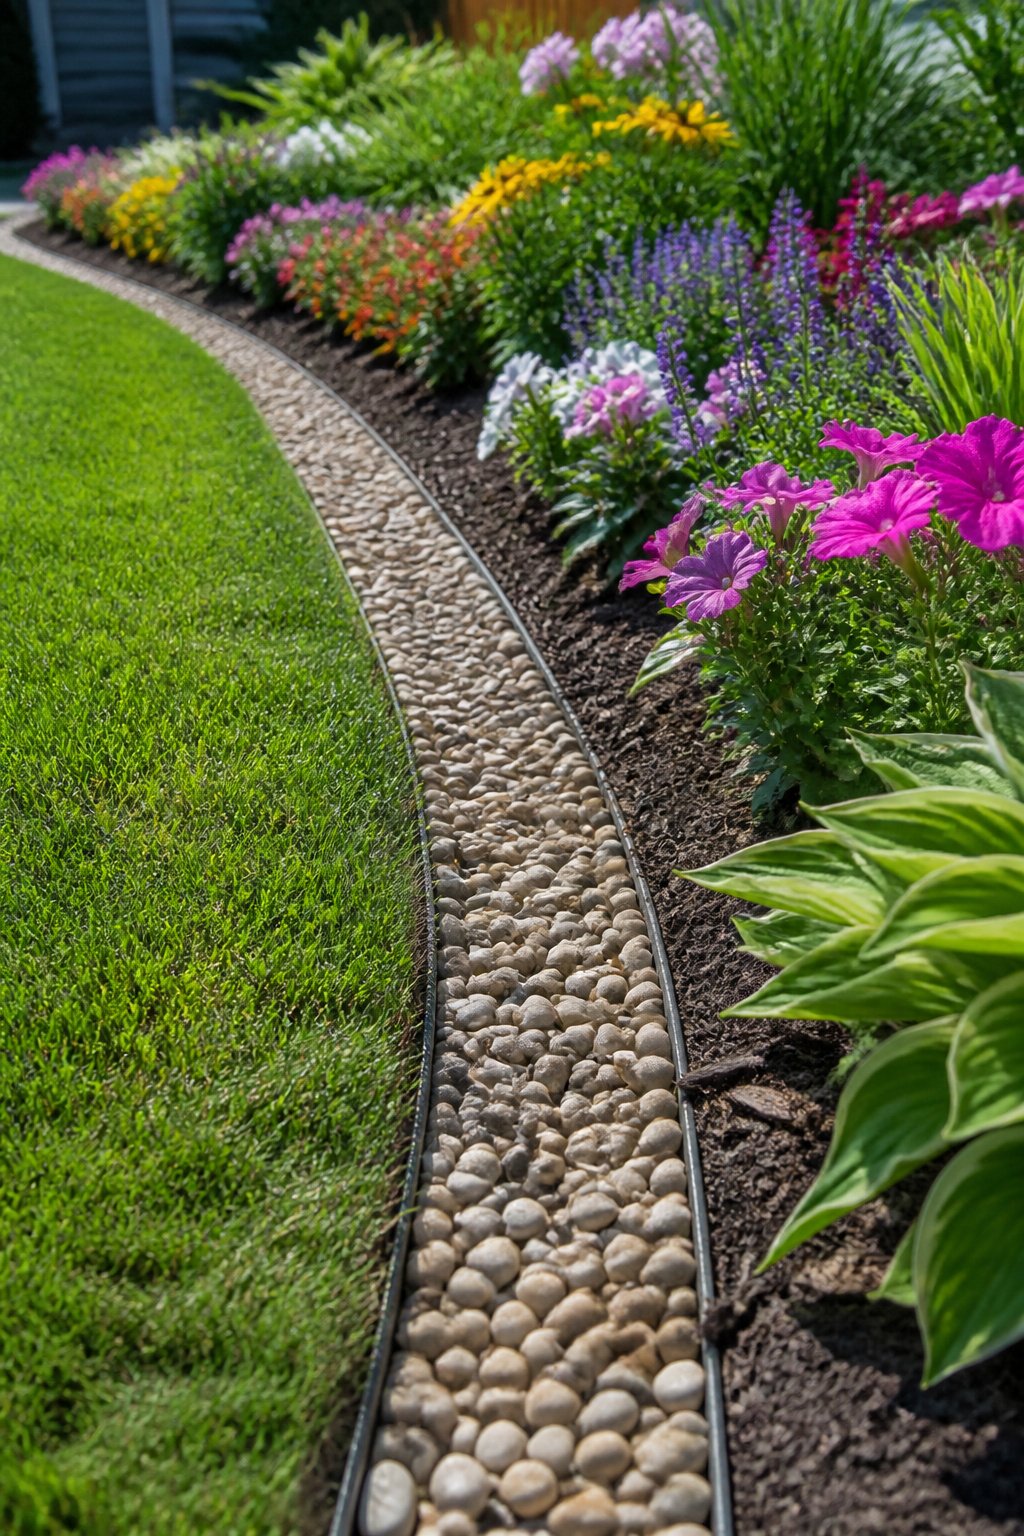
A strip of gravel or pebbles between lawn and bed gives a clean visual break and doubles as a mowing strip, which makes trimming along the edge much easier. Pea gravel, river rock, and crushed stone are the usual choices, depending on the look you want.
Dig a shallow trench about six inches wide, line it with landscape fabric to suppress weeds, and fill with your chosen material. The fabric matters more than you might think. Without it, the stone sinks into soil over time, weeds push through within a season, and the edging becomes far more work than you signed up for.
The stones will scatter and settle, so plan on topping up every year or two. That upkeep is the trade-off for a border that costs relatively little up front and asks only occasional attention rather than seasonal rebuilding.
5. Timber Edging
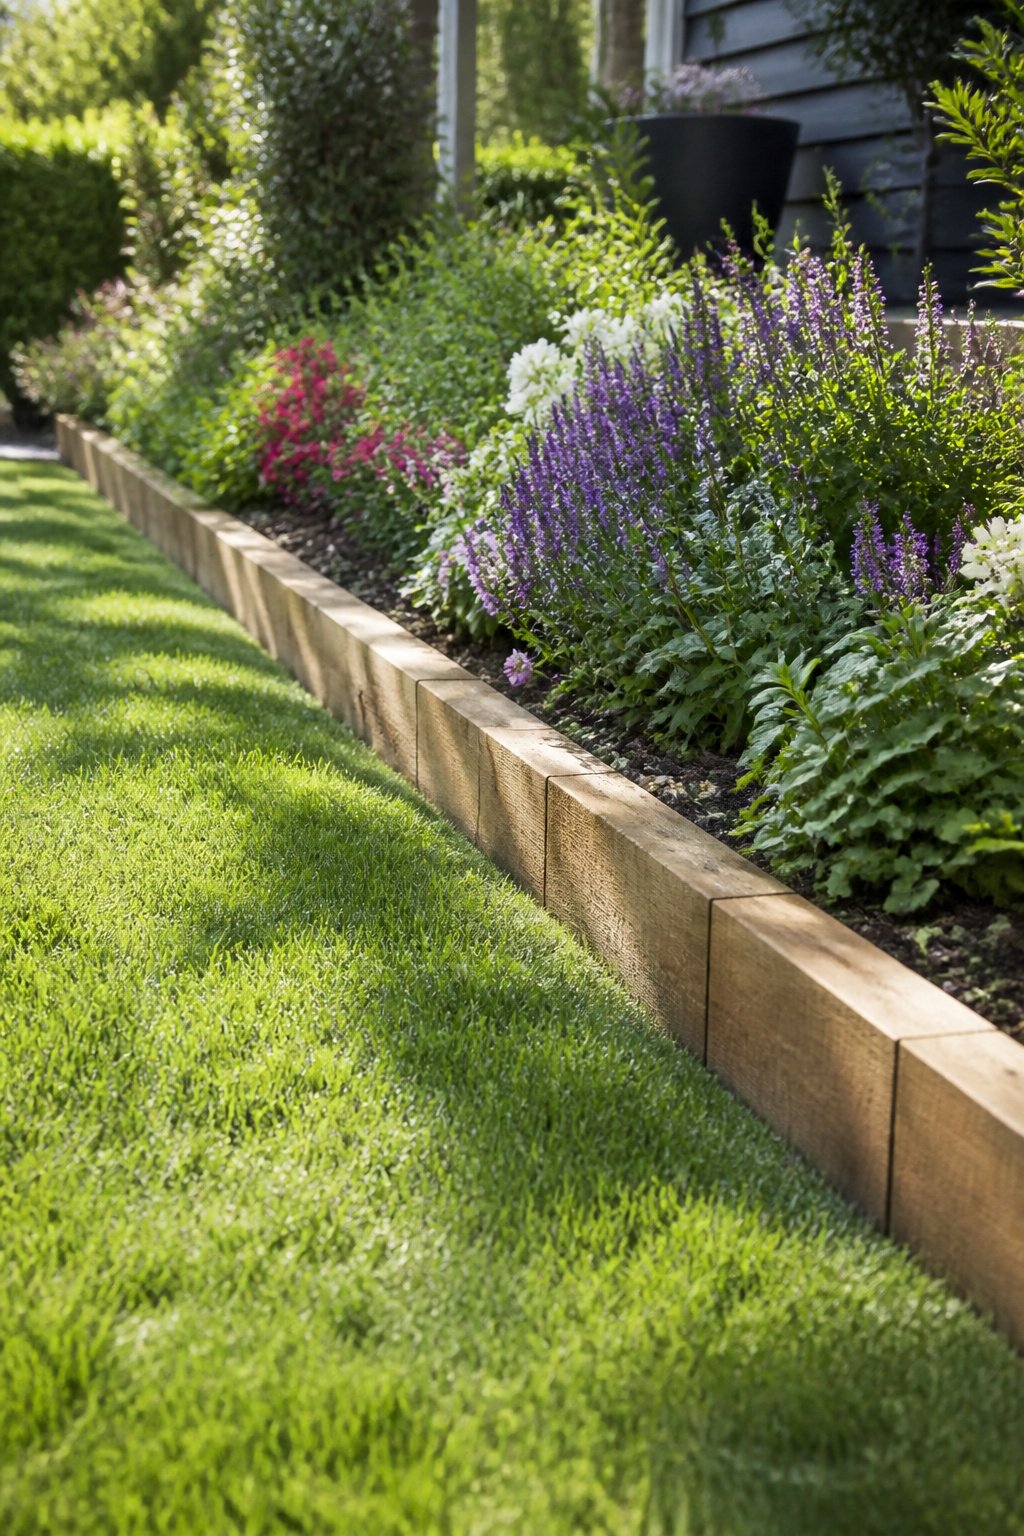
Timber planks give a clean, straight edge for cheap, and they go in fast. Pressure-treated lumber resists rot well enough for most beds, though the treatment history matters. Older stock was pressure-treated with chemicals now restricted in some areas, so checking local codes before you buy is worth the five-minute phone call. I have not had to replace mine yet, but in damp climates the general rule is five to seven years before the boards soften enough to matter. For curves, pick something else. Timbers do not bend, and trying to force them wastes the afternoon. Straight runs and right-angle corners are where they earn their keep. Drive rebar or long spikes through holes bored near the ends to keep the line from drifting over a wet season. Some gardeners skip treatment entirely around vegetable beds, which is a choice I understand even if I have gone the other way. Untreated wood just means planning on earlier replacement.
6. Metal Edging
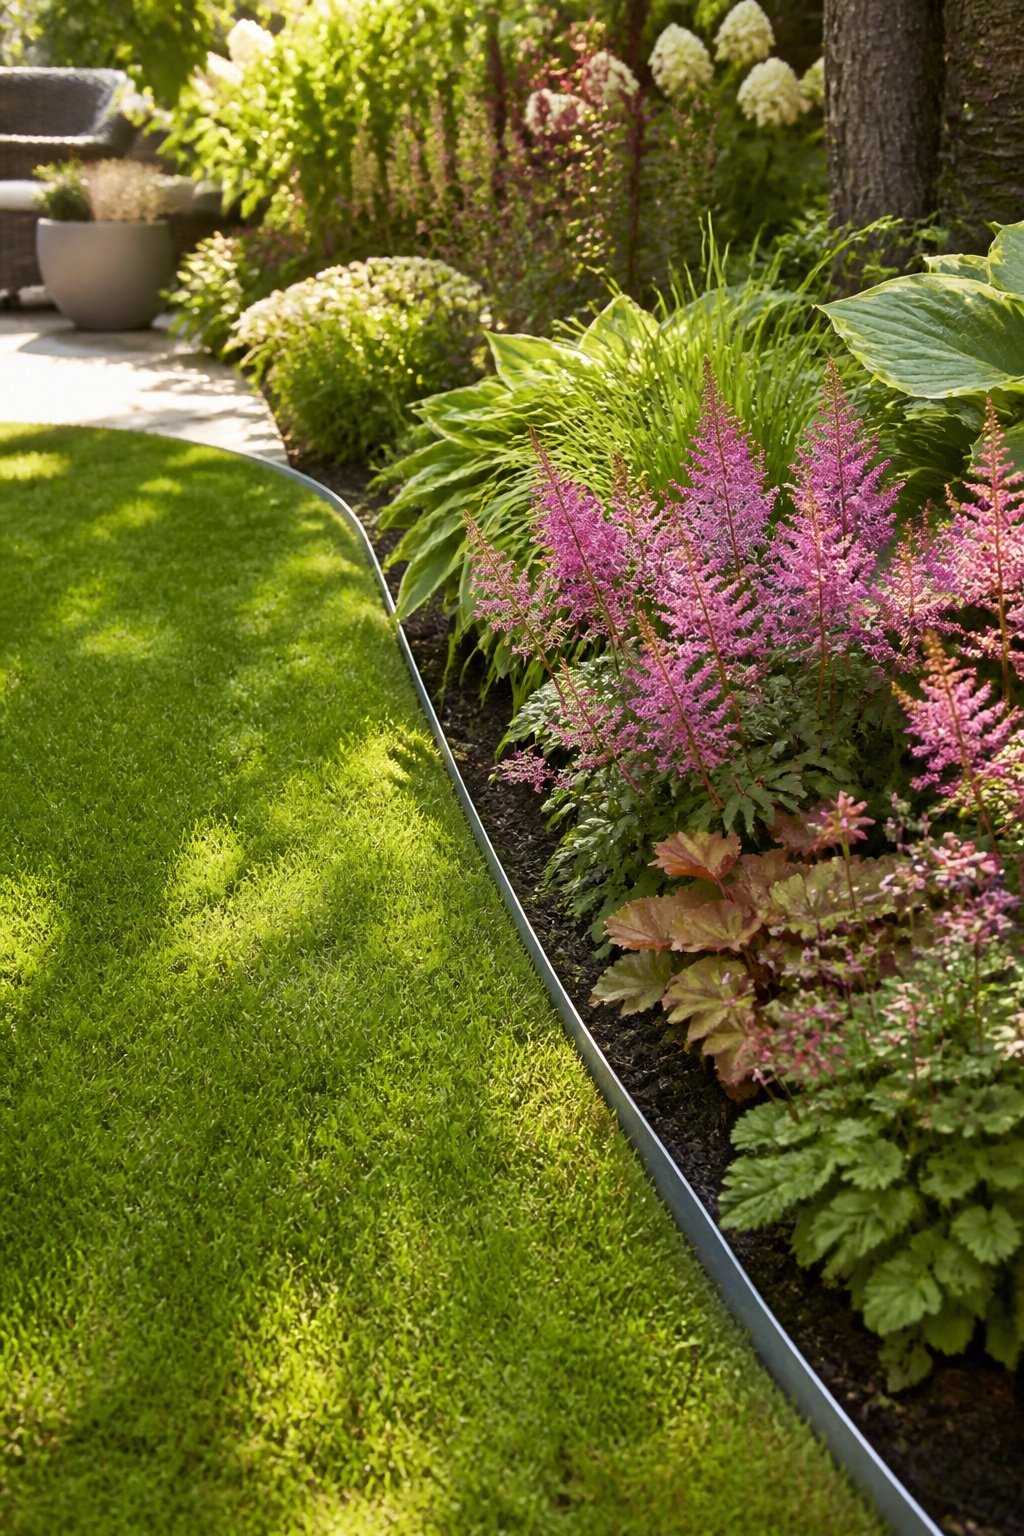
Metal edging draws the thinnest, most precise line of any material I have seen in a yard. The strip sits nearly flush with the ground, so once it is in, the plants become the focus and the border itself almost disappears.
Steel and aluminum are the two options that matter. Steel is heavier and stiffer, which helps it stay put in loose soil, though it will darken into a rust patina over the years. Aluminum bends around curves more willingly and stays bright, but its lighter weight means it can shift if the soil is not packed well. Both install with stakes pounded along a trench line, and both come in colors like black, brown, bronze, and green if you want the edge to read as a thin line of shadow rather than silver flash.
I like this choice for the gardener who wants separation without statement. It works between lawn and bed, gravel and flowers, patio and mulch, and the curves follow the actual flow of your space instead of forcing everything straight.
7. Mulch Border
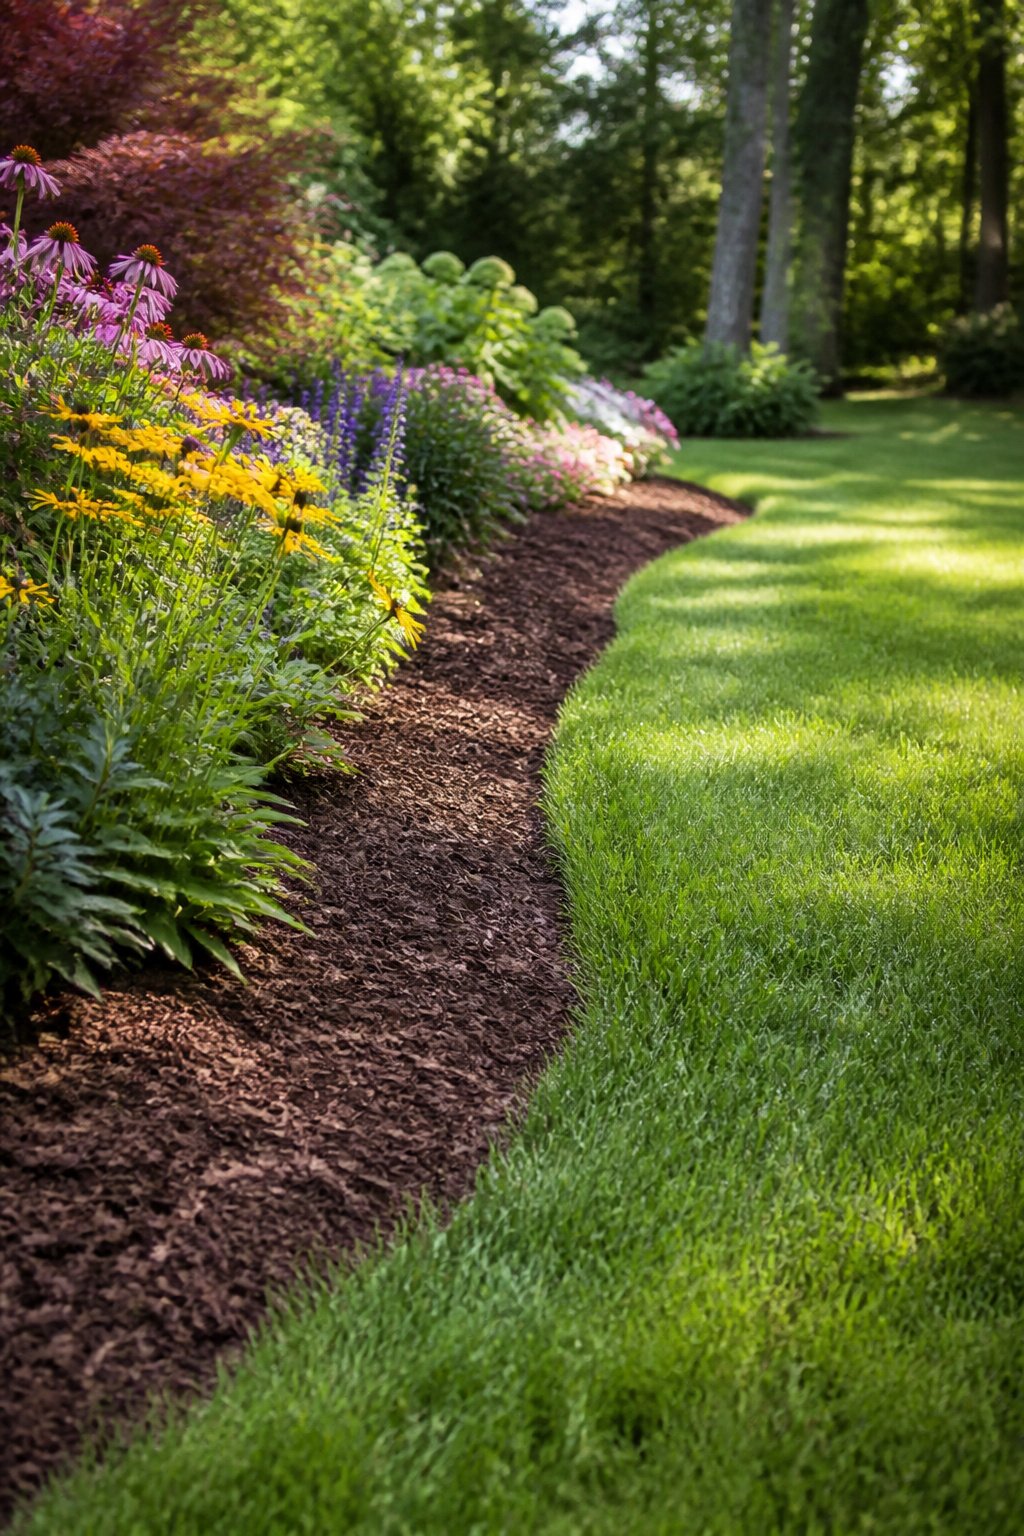
A mulch border is about as informal as edging gets, and that is exactly why it works in certain yards. If you already buy mulch for your beds, extending the layer two to three inches past the plant line costs nothing extra and creates a soft transition from bed to lawn. The visual line is gentle, almost blurred, which suits relaxed garden styles better than crisp geometry.
The catch is maintenance. Mulch breaks down, and rain will push it around, so expect to top it up once or twice a year. Grass will also creep in underneath since there is no physical barrier to stop it. One way to slow that down is cutting a shallow trench along the edge, hidden below the surface, while keeping the soft mulch look above. I have skipped that step before and spent more time pulling runners than I saved by not digging.
8. Living Plant Borders
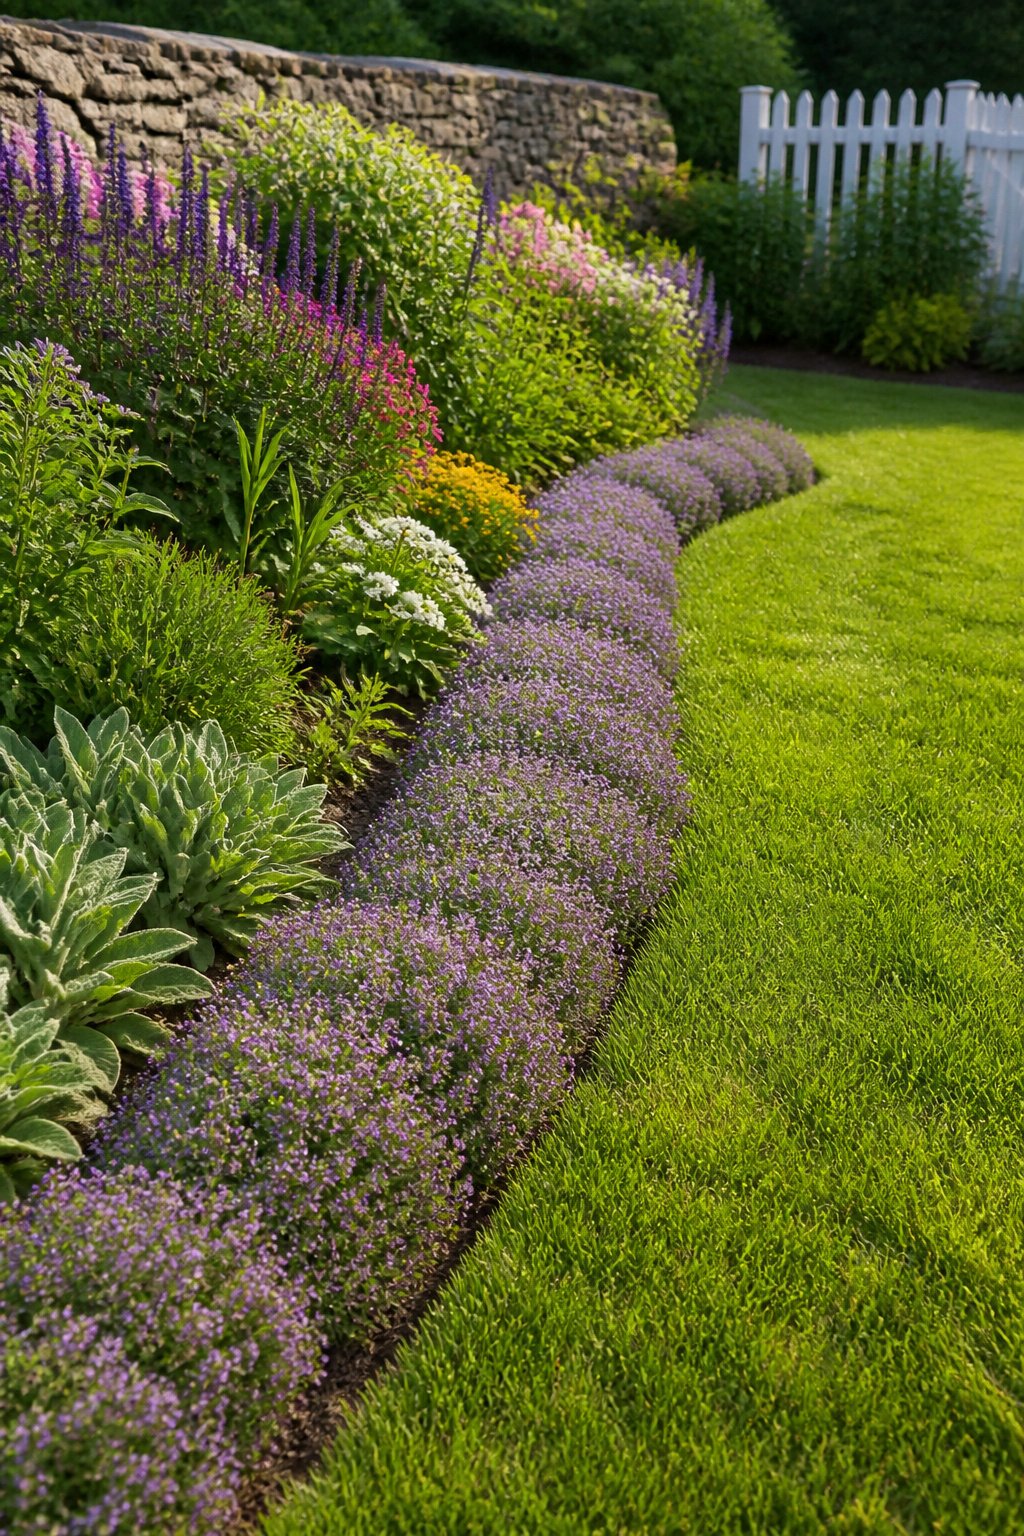
A row of low-growing plants set six to ten inches apart does the defining work of an edge while adding color and texture no stone or brick can match. Creeping thyme spreads into a mat that releases scent when you brush past it. Miniature roses repeat bloom at knee height and return each year without the fuss of their full-size cousins. Boxwood stays green through winter and takes shaping if you want a formal line.
The catch is patience. A planted edge needs two or three seasons to fill in, and it will not stop grass from marching in the way a physical barrier does. Spacing matters more than what you see at the garden center. Alyssum mounds to about six inches and works along a path; Lucerne Blue Eyed Grass spreads eight to ten inches and blooms blue through summer. Measure the mature spread, not the first-year pot size, or you will be digging up and restarting the whole line by year three. I have learned to place the slowest growers closer together and let the aggressive ones breathe, because ripping out an overgrown border is harder than waiting an extra season for it to knit together.
9. Log Rounds
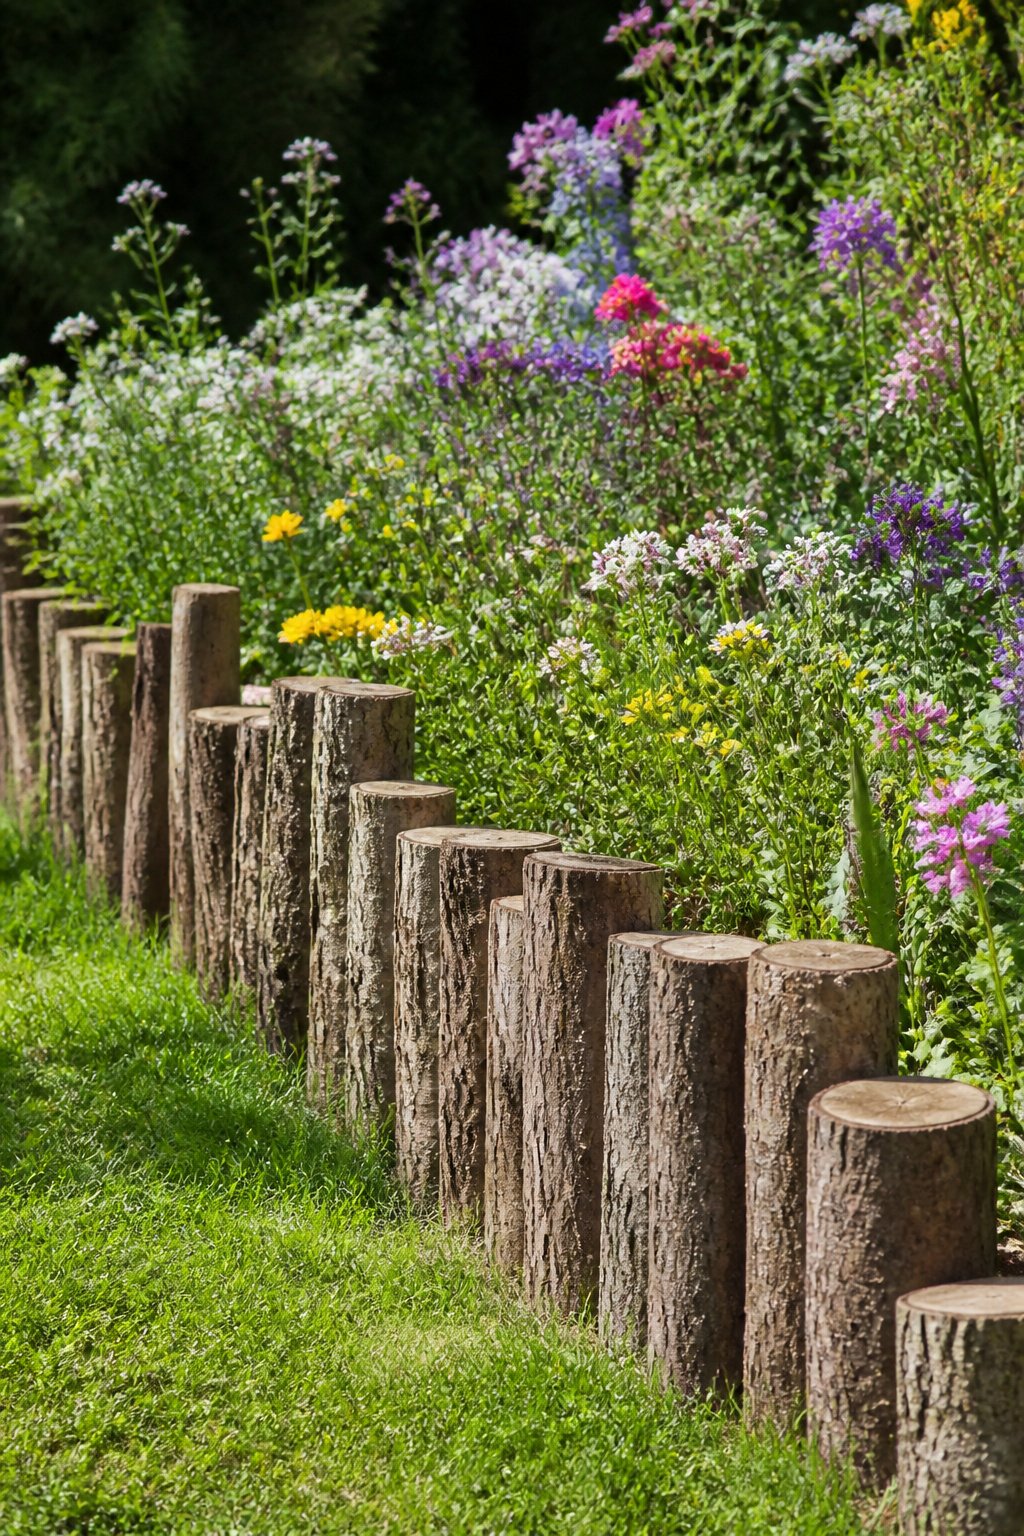
Log rounds give an edge that looks like it grew there instead of being installed. Slices of trunk six to eight inches tall, set upright in a shallow trench, create a woodland border with uneven heights and natural bark that suits cottage plantings or anywhere a perfect line would feel wrong. The material costs nothing if you have access to fallen trees or a neighbor who has had one taken down.
Hardwoods outlast softwoods, and the species matters more than I expected. Black locust and cedar will hold up for years, while maple or pine softens faster in damp soil. I lost a row of birch rounds to ants in two seasons, so now I check the wood type before I set anything in the ground. Untreated wood in contact with soil will always rot eventually, and depending on your climate you may need to replace sections every few years. For a longer-lasting rustic edge, choose your species deliberately or accept the maintenance as part of the look.
10. Pavers
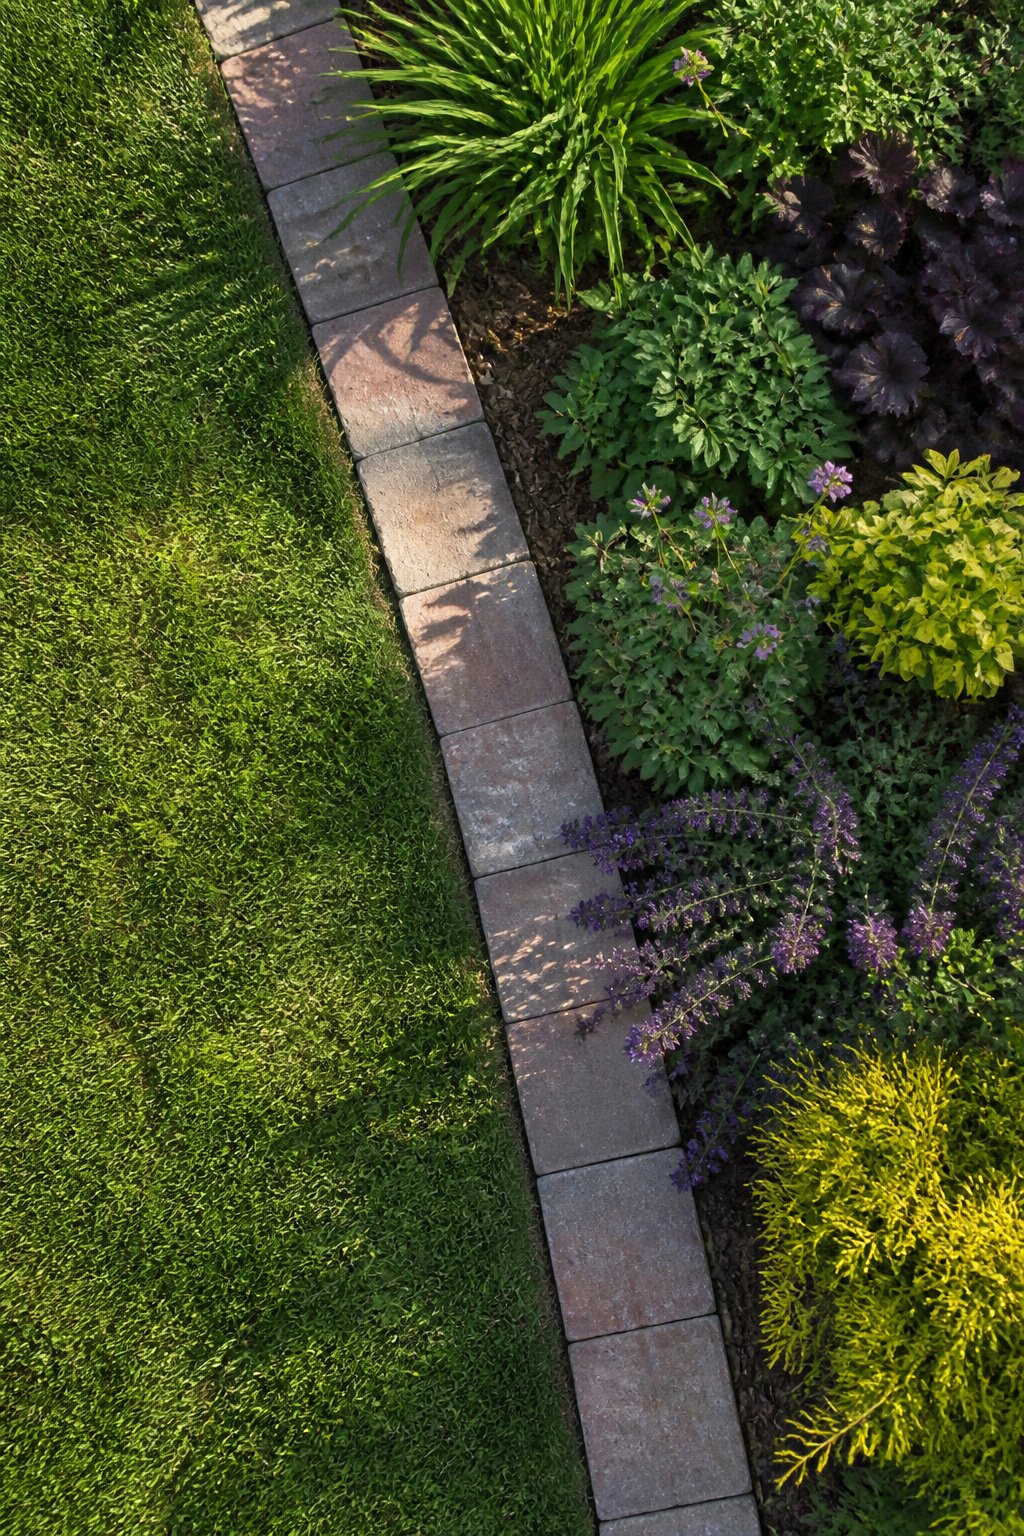
Pavers give a border that looks deliberate without looking fussy. Concrete ones run cheapest at any big-box store, while clay brick and natural stone step up in price and weather to softer colors over time. Shapes range from standard rectangles to scalloped profiles; flip the scalloped kind face-down and the top edge reads as a flat, modern line.
Two setups matter for lawns. Set pavers flat and flush with the sod, and the mower deck rides right over them with no string-trimming. Stand the same units on edge in a shallow sand trench, and they become a low wall that keeps soil off the grass. Either way they are heavy enough to stay put without mortar, which keeps the project a one-person Saturday job.
11. Corten Steel Edging
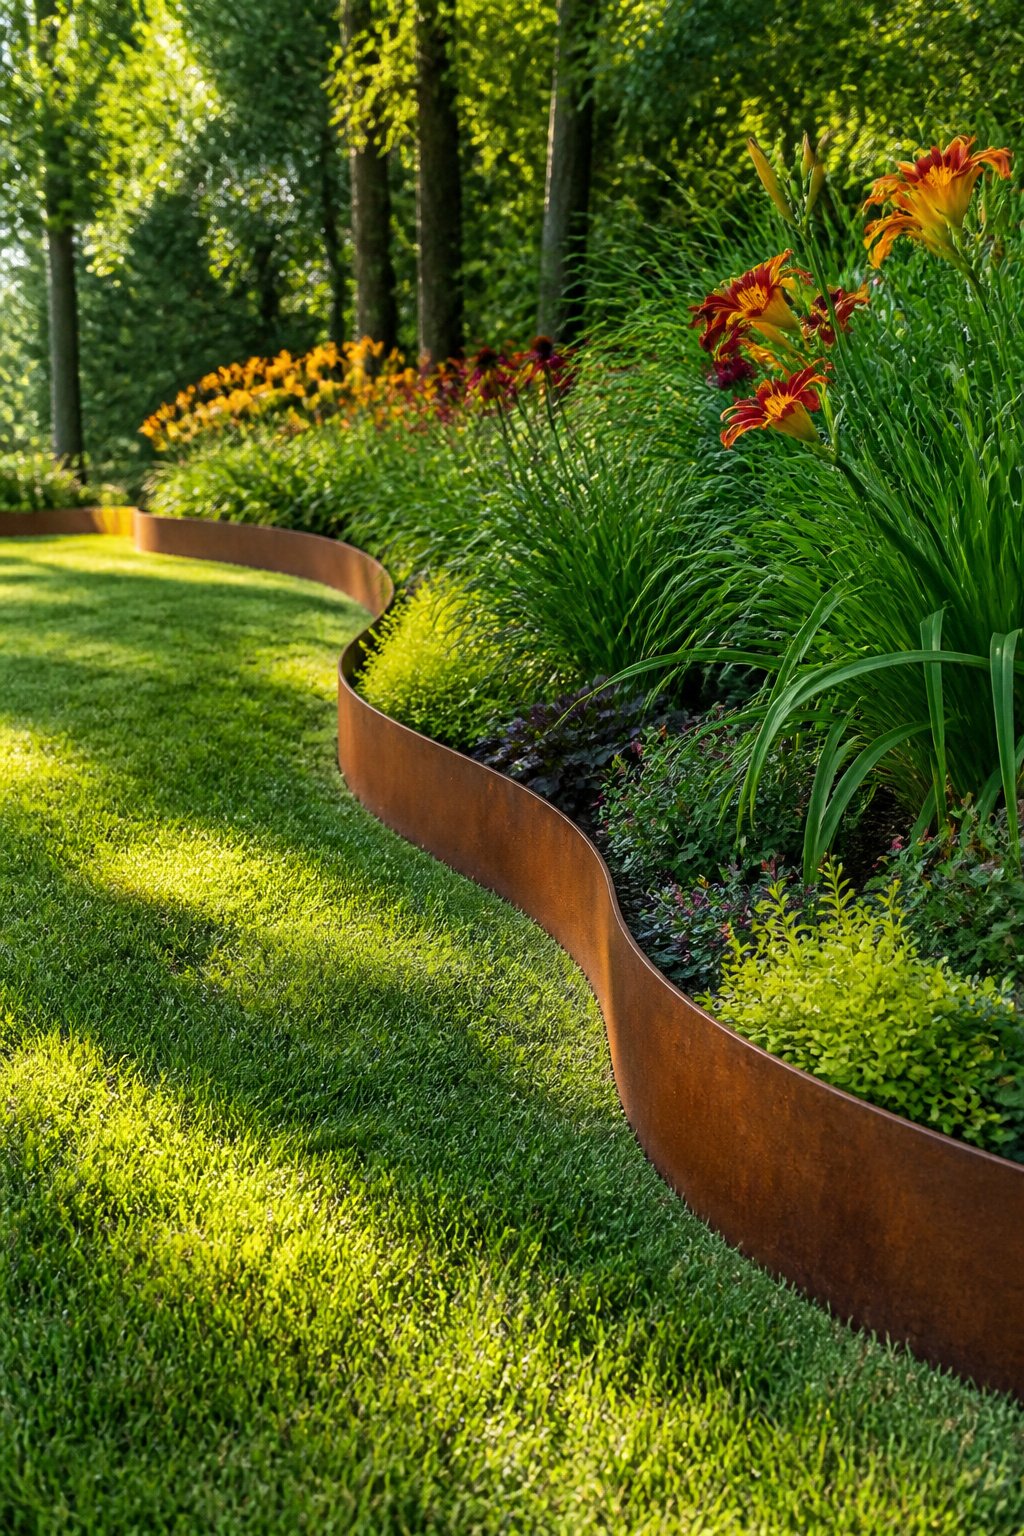
Corten steel edging costs more upfront than standard steel, but the longer lifespan usually closes that gap. What sold me, reading through the options, was the way the finish evolves: the surface develops an orange-brown patina that stabilizes into a protective layer rather than eating deeper. It is not the active, powdery red rust that flakes off and weakens the metal.
That same color can become a liability against pale stone or concrete. Water splashing off the steel will carry rust particles onto adjacent surfaces, and the staining is stubborn once it sets. If your path or patio is light porcelain or pale gravel, plan a buffer strip or expect to live with the marks.
The material bends well into curves, which matters more than I expected for defining beds against lawn. For dry-region gardens or anywhere warm native stone already sets the tone, the color reads as intentional rather than industrial. Installation is manageable solo; the strips are pliable enough to shape by hand, though a second pair of arms speeds the alignment.
12. Recycled Rubber Edging
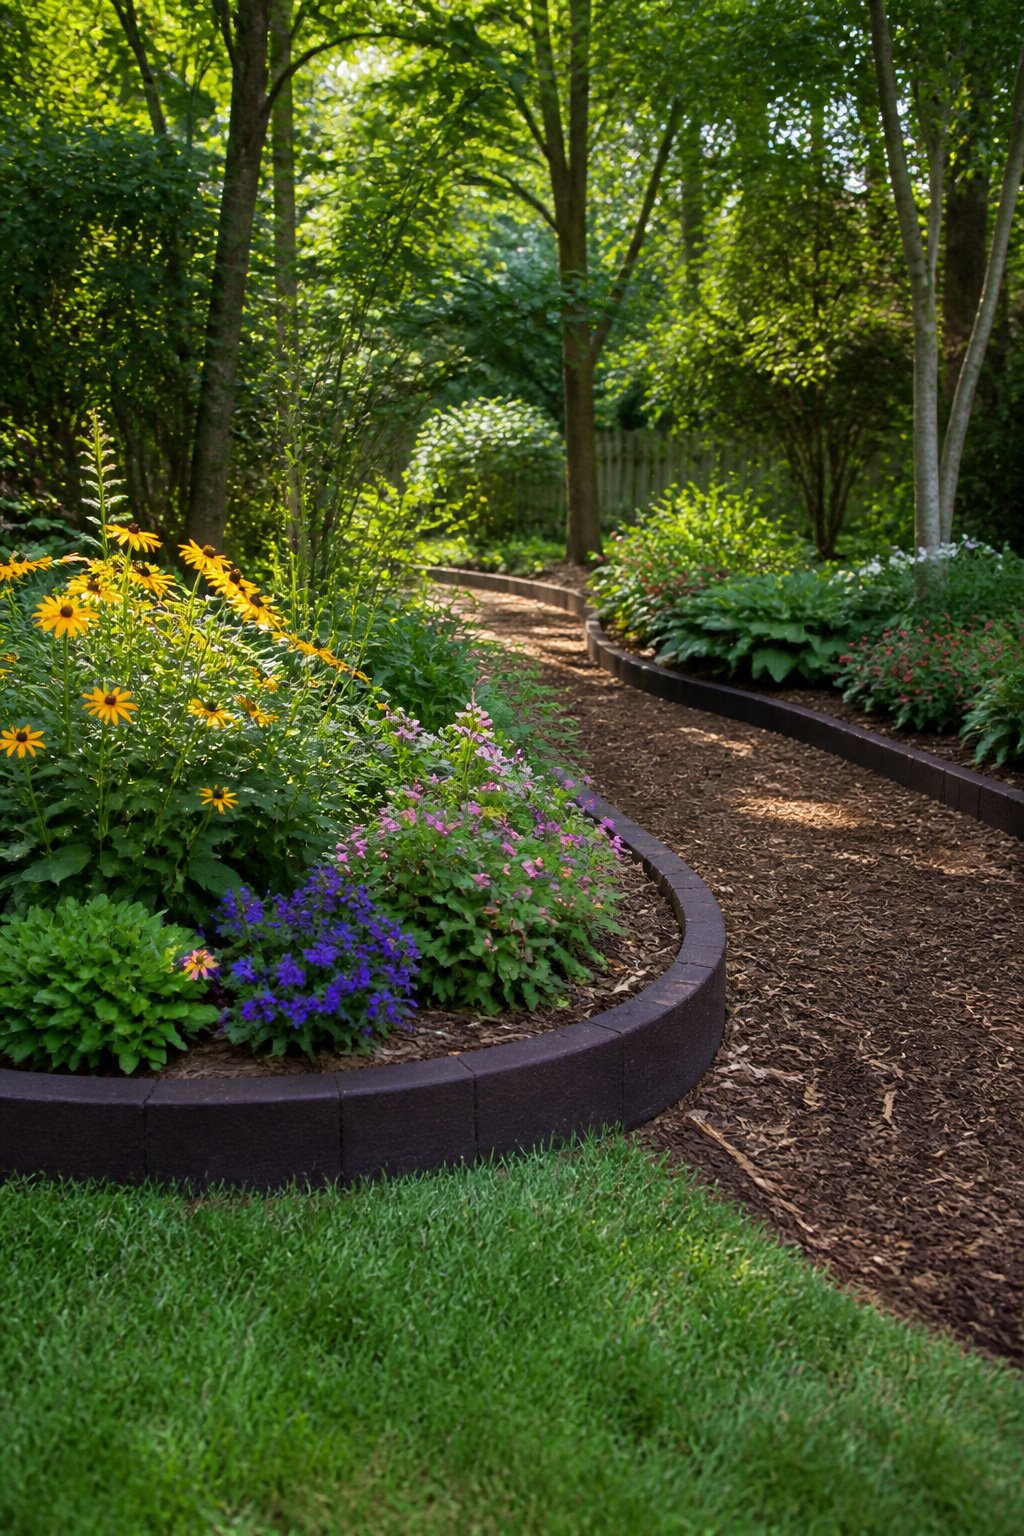
Recycled rubber edging bends around curves without cutting, which matters more than looks in spots like driveway beds where the ground line meanders. The material comes from ground tires, so the color choices run to black, brown, and red-brown. Up close, the surface reads industrial.
I used it along my own driveway bed for exactly that reason: flexibility beat appearance there, and the price was right for a project that needed to wrap around an awkward corner. It is affordable and easy to install, which helps if you are working alone and do not want to rent a wet saw or wrestle stone into place.
The tradeoff is real. Rubber edging wins on curves and budget, not on refinement. If your bed sits against a patio where you spend evenings, the texture shows. For a side-yard bed or a driveway border you pass at speed, the practicality usually pays off.
13. Concrete Edging
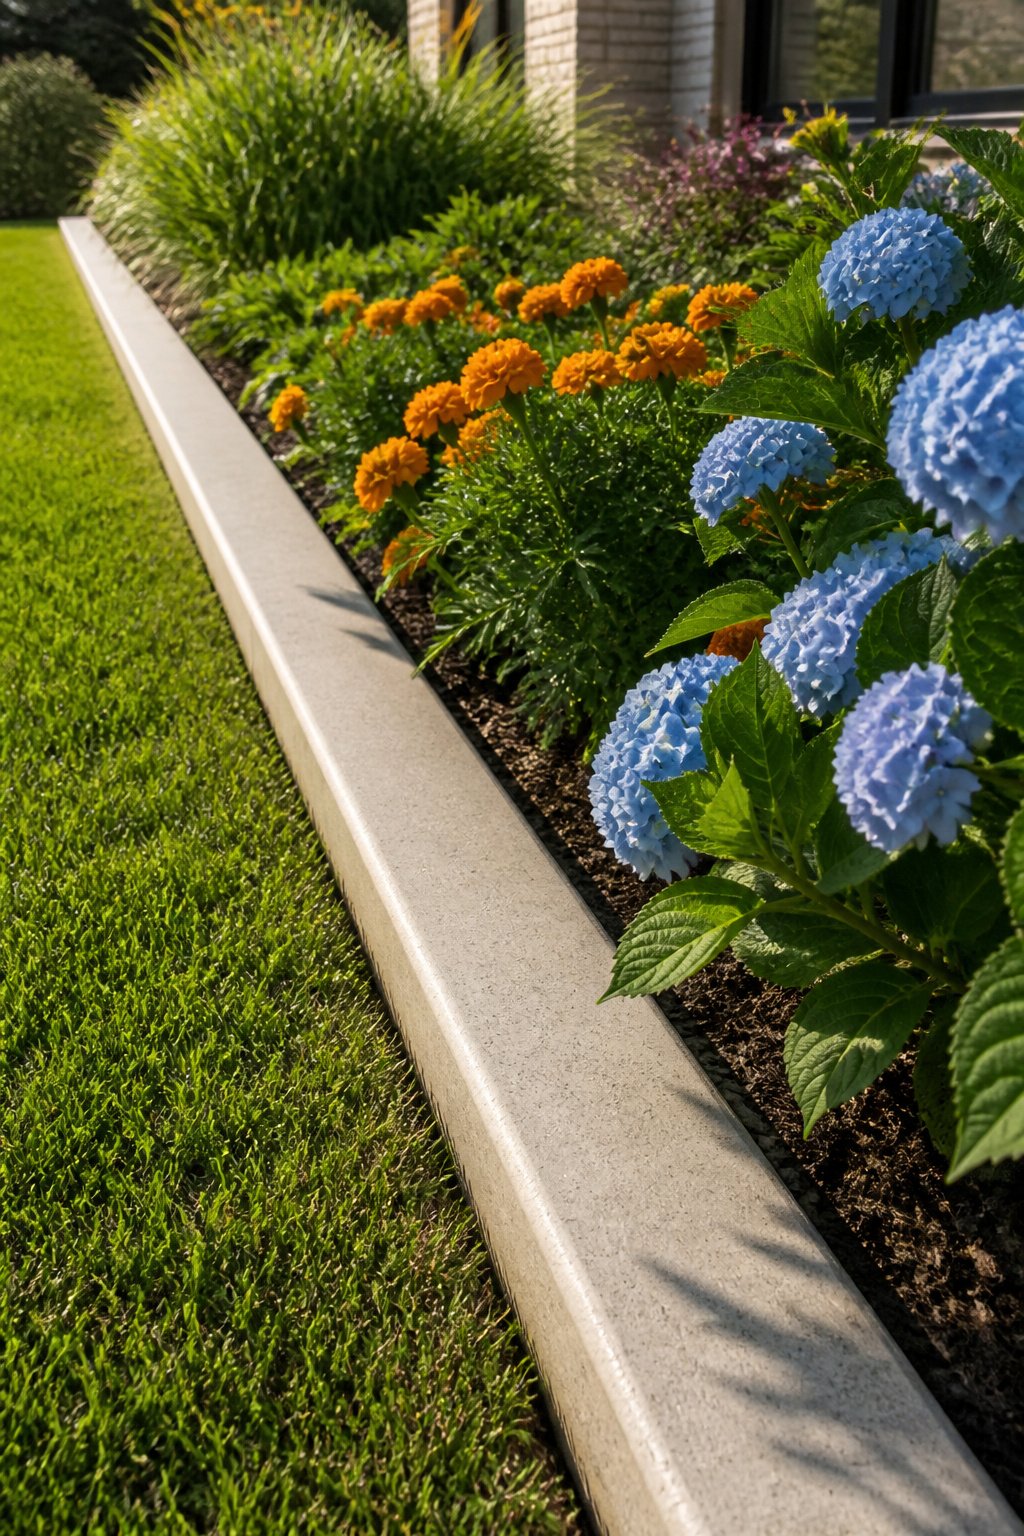
Poured concrete edging gives the most permanent and structured look of anything in this list. The material sets into curves and custom shapes that follow a bed line exactly, and once cured it does not shift or rot. That same permanence is the risk: in cold climates, ground heave cracks the slab if the base settles or water freezes underneath. Control joints every four to six feet divide the run into panels so a crack stays a hairline instead of a zigzag across the whole border.
Precast blocks skip the forms and the curing wait. Scalloped concrete pavers set upside down hide the profile and read as a clean, straight line, which is a cheap hardware-store hack that works. Cost runs between $15 and $20 per linear foot for curbing; a raised wall profile sits at the higher end of that range or above.
14. Bamboo Edging
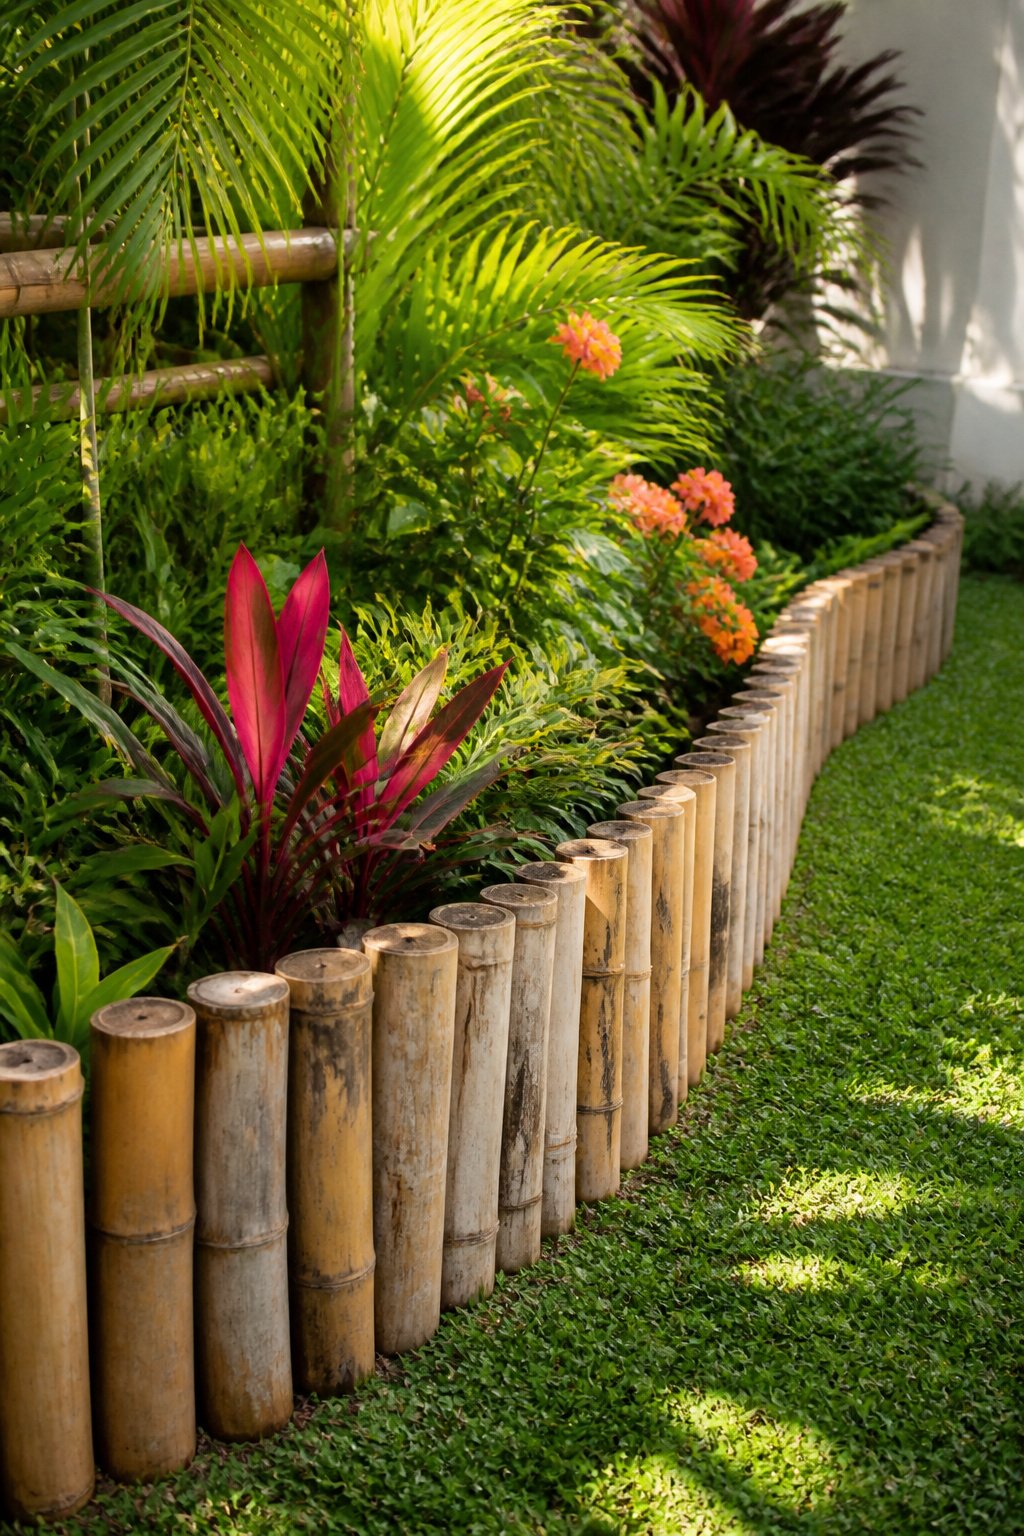
Bamboo edging reads as a deliberate choice, the kind that signals a tropical or Japanese-inspired garden without shouting it. The warm-toned poles draw a clean line between lawn and bed, and when freshly installed, they carry a light golden color that softens the whole border.
The environmental appeal is real, though it comes with a practical split. Dried bamboo poles, the kind sold in bundles for edging, weather fast. In my zone 6 garden they split and turned silvery gray after two winters, which some gardeners like and others count as failed. Use clumping bamboo only if you plant live; running bamboo roots will travel under the lawn and surface two seasons later in places you never chose. The maintenance then becomes removal, not trimming.
For the $500–800 annual gardener, dried poles sit at the budget end, but factor in replacement every few years if you want that honey color to last. Live clumping varieties cost more upfront and need a contained trench or root barrier to behave. Either way, bamboo rewards a specific vision more than a grab-and-go border solution.
15. Plastic Edging
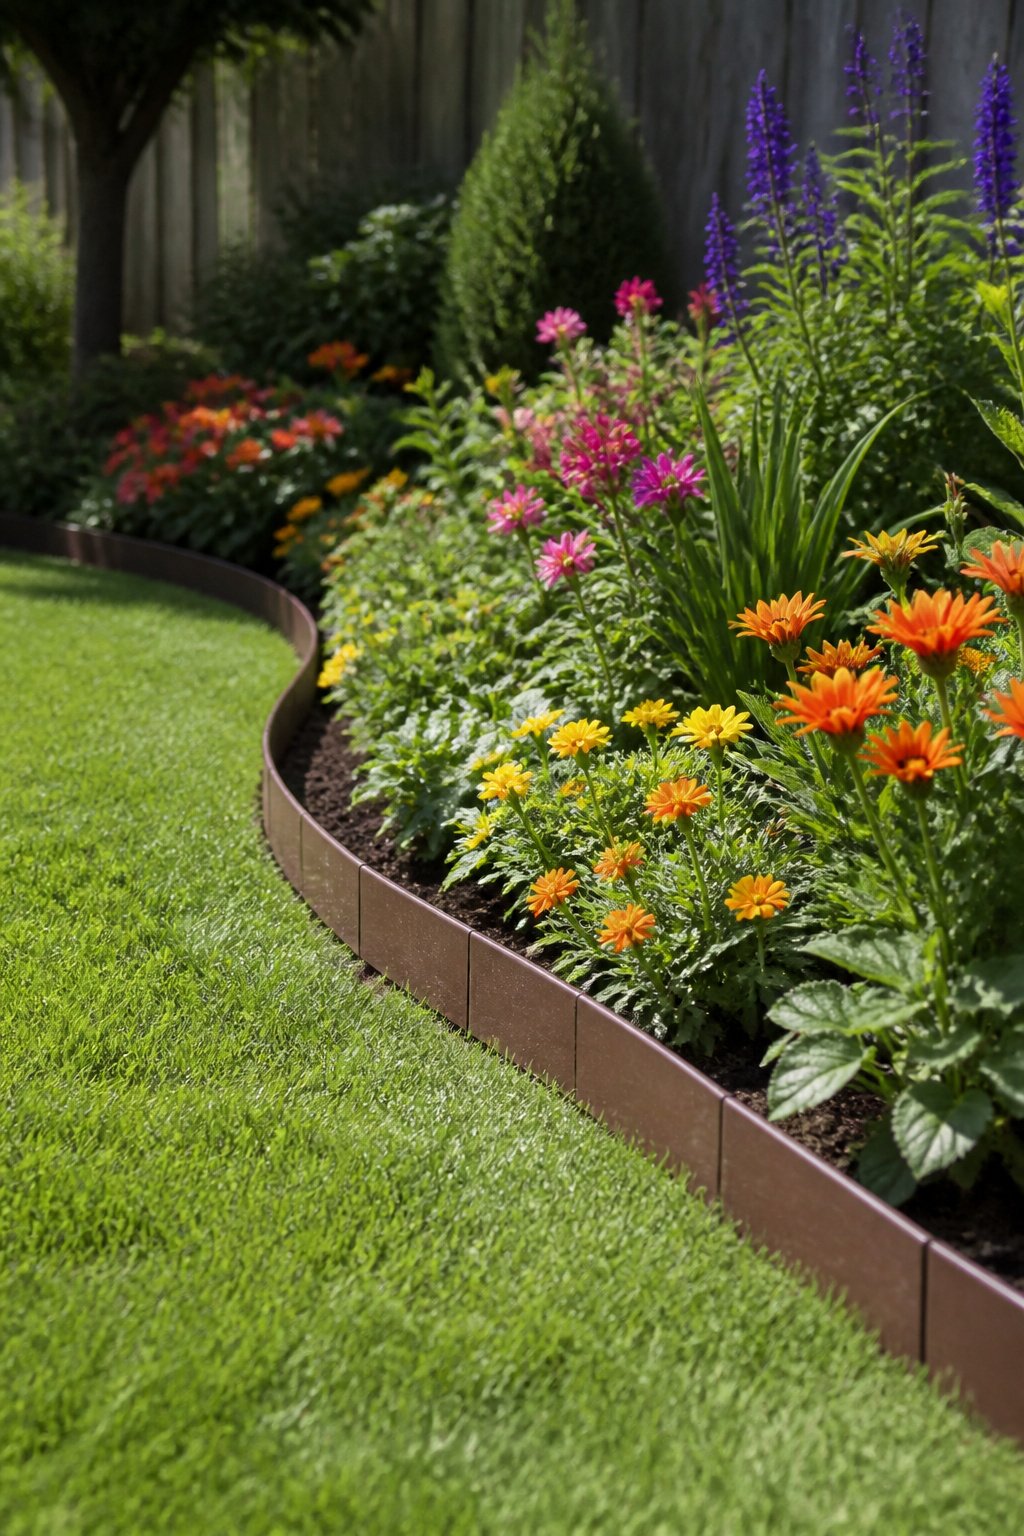
Plastic edging is the material I have replaced more than any other in my yard, and that alone says something about the trade. The rolls are lightweight, easy to cut with shears, and cheap enough that redoing a bed does not feel like a disaster. Pound-in styles with attached stakes go fastest: no trench, just a mallet and a straight line or curve. The roll type needs separate stakes every two feet, which adds steps but also flexibility around odd corners.
Five to seven years of sun exposure is the real limit. UV makes the plastic brittle, and the cracks start at the top edge where the material is thinnest. I have pulled up sections that shattered like old Tupperware. In cold weather, the ground freeze can heave even the pound-in panels; once the soil thaws, they tap back in, but it is an annual chore in some zones. The low upfront cost still draws me in for temporary beds or rental properties where long-term durability does not matter. For anything permanent, I budget for a second install halfway through the decade.
16. Wattle or Willow Edging
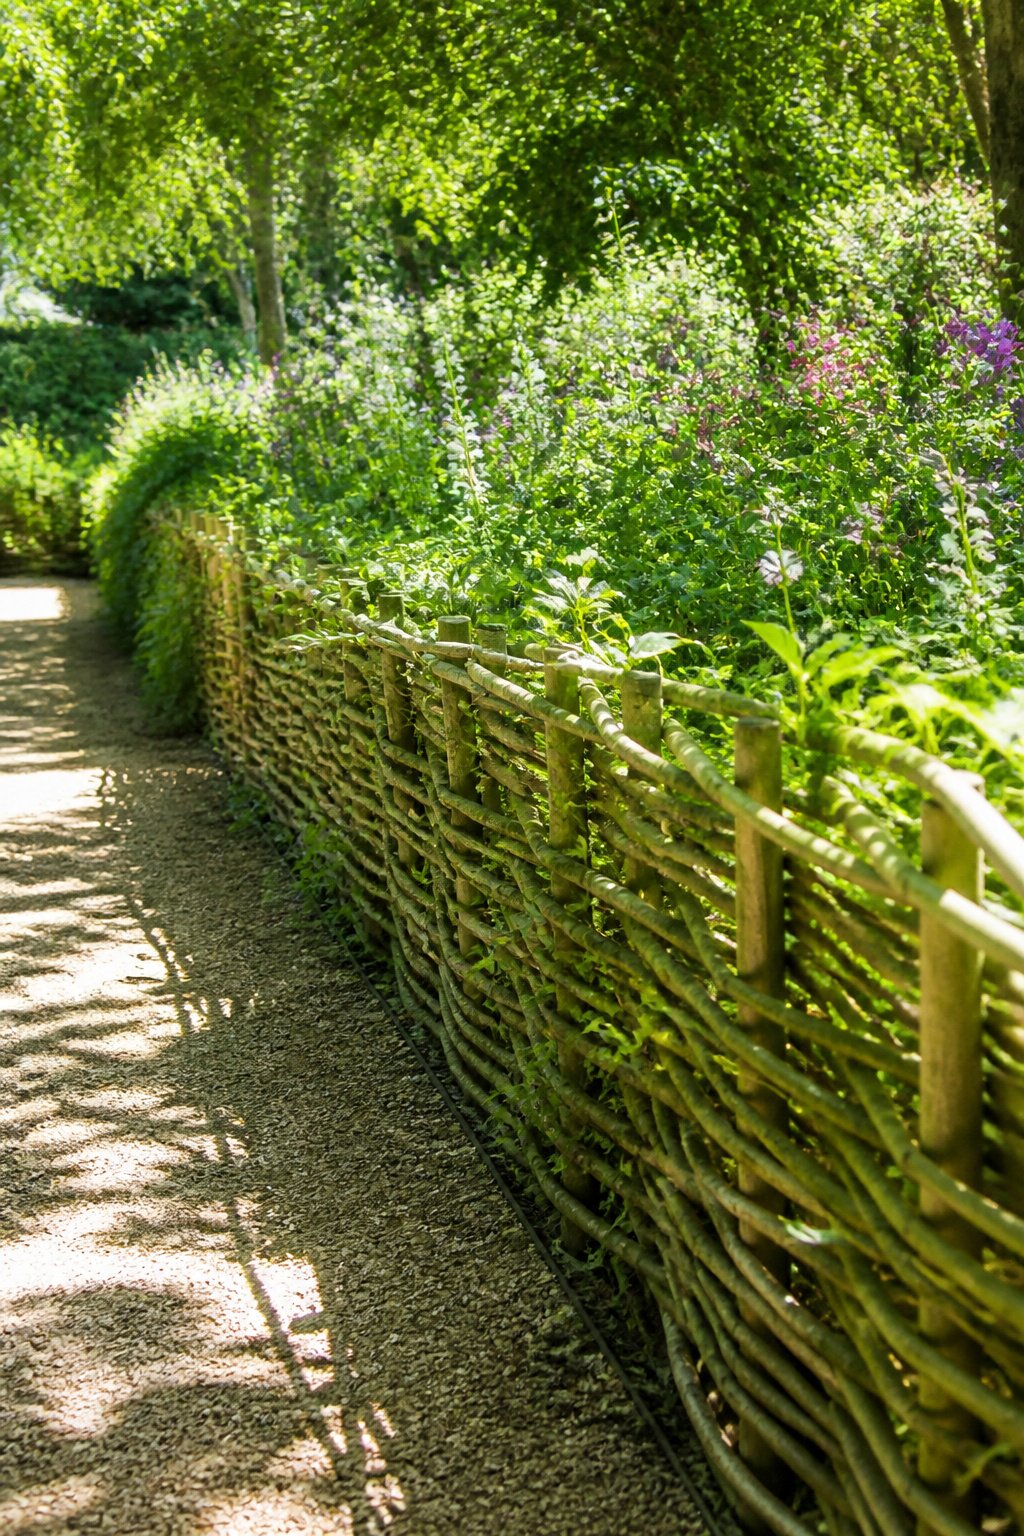
Wattle edging gives a garden the look of an English cottage border that happened on its own. Hazel or willow rods weave between upright stakes pounded into the ground, and because the wood is still green, it can root in damp soil and leaf out. The fence becomes a living thing that fills its own gaps.
That self-repairing quality is the main reason to choose it over other natural edges. The rods root where they touch the ground, so small breaks mend themselves for the first few seasons. The woven part rots through at soil level after three to four years, which is the honest lifespan to plan for. Metal stakes help it hold shape longer, but the woven material itself is temporary.
For a gardener on a $500–800 annual budget, wattle edging sits at the low end for materials and high end for labor. The rods are usually free or cheap if you have a source; the work is the weaving itself, done while the wood is flexible enough to bend without snapping. Damp soil is non-negotiable, dry beds will not root the green wood, so this is a choice for gardens that already hold moisture or for edges you are willing to water.
17. Ornamental Grasses
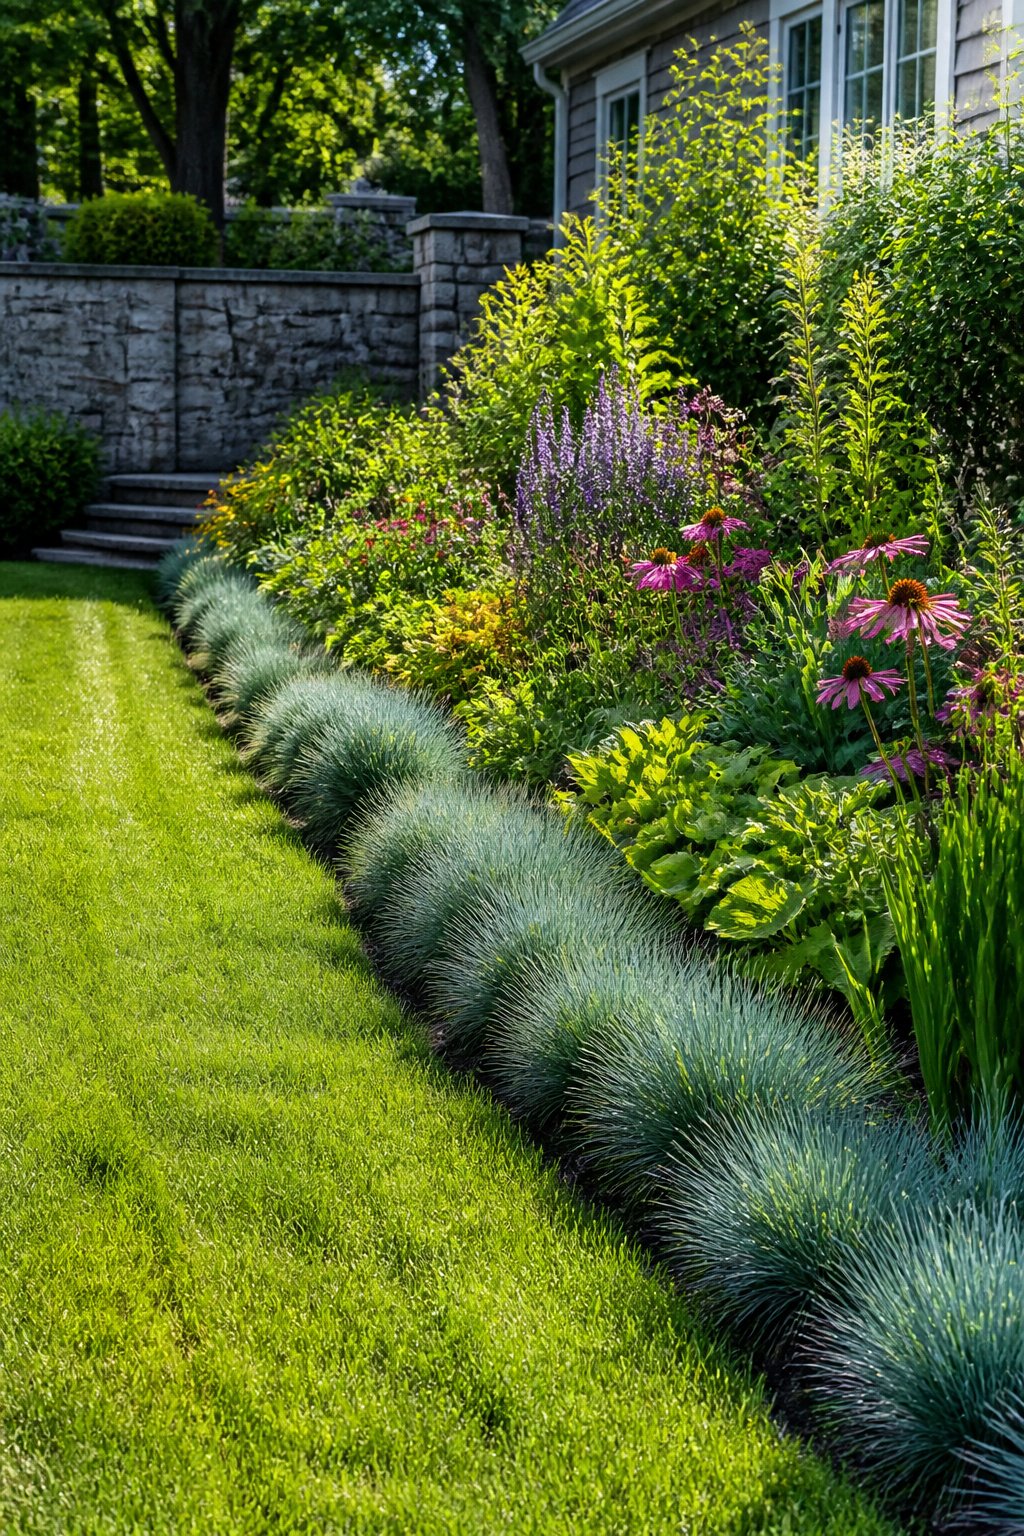
Ornamental grasses give a garden edge texture and color, but only certain types earn their keep as a low mounding variety like blue fescue or liriope. Tall grasses look dramatic in a catalog photo, then spend the growing season flopping into the lawn and forcing you to mow around them every week. The short ones stay neat and let the machine pass.
The tradeoff is the winter gap. In northern zones, ornamental grasses die back to straw from November through March, so the edge vanishes for nearly half the year. A hard material would still read as a boundary in February; grass reads as a forgotten corner. That matters less along a path, where the pavement still defines the line, than right up against turf, where the lawn starts creeping the moment the plants go dormant.
I like the look once it fills in, but filling in takes time. Divisions from a single clump can spread over a couple of seasons before they knit together into a solid band. Henry Ho planted around 20 divisions of Japanese sweet flag and waited a few years for the edge to finish itself. That patience buys an organic border no brick can match, and the grasses become features in their own right once they mature. Just know what you are signing up for: living edging rewards the wait, but it never stops grass the way a physical barrier would.
18. Miniature Fences
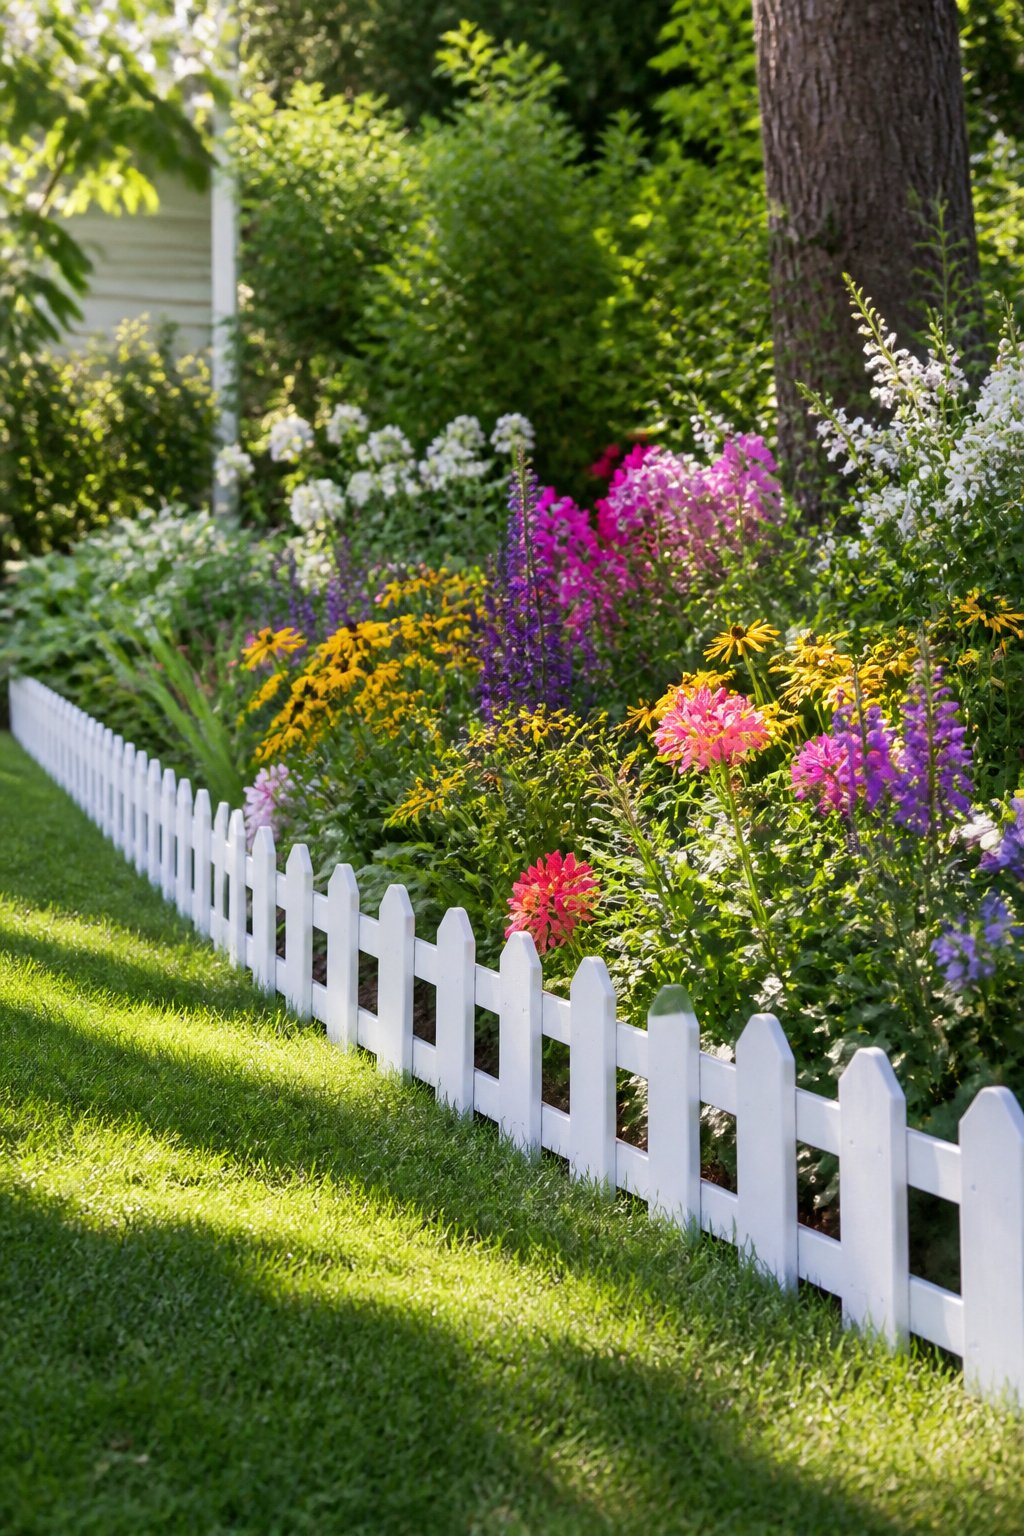
A miniature fence can read as edging or as a small barrier, and the difference is almost entirely height. Anything under six inches tall keeps the visual line low enough that plants behind it still read as part of the same bed. Push past twelve inches and the same strip of pickets or wrought-iron look starts casting shade on the front row of whatever you planted, which turns the fence into a wall with its own microclimate.
Plastic resin versions are the cheapest way in. They come in picket styles, wrought-iron patterns, and a few designs meant to look like PVC stakes standing on end with sealed tops, paintable if you want to change the color. The tradeoff is what you’d expect: they weather faster than the real materials they imitate. Wood or metal costs more upfront but survives seasons of actual sun and freeze-thaw without getting brittle. Most wrought-iron-style edging links in six- to twelve-inch pieces with stakes at the base, which makes installation faster than it looks.
Match the fence to the garden it borders. A crisp picket reads formal against a cottage bed whether you intended that tension or not, and a rusty wrought-iron look against modern plantings can feel like costume rather than character unless you committed to the contrast on purpose.
19. Stone Blocks
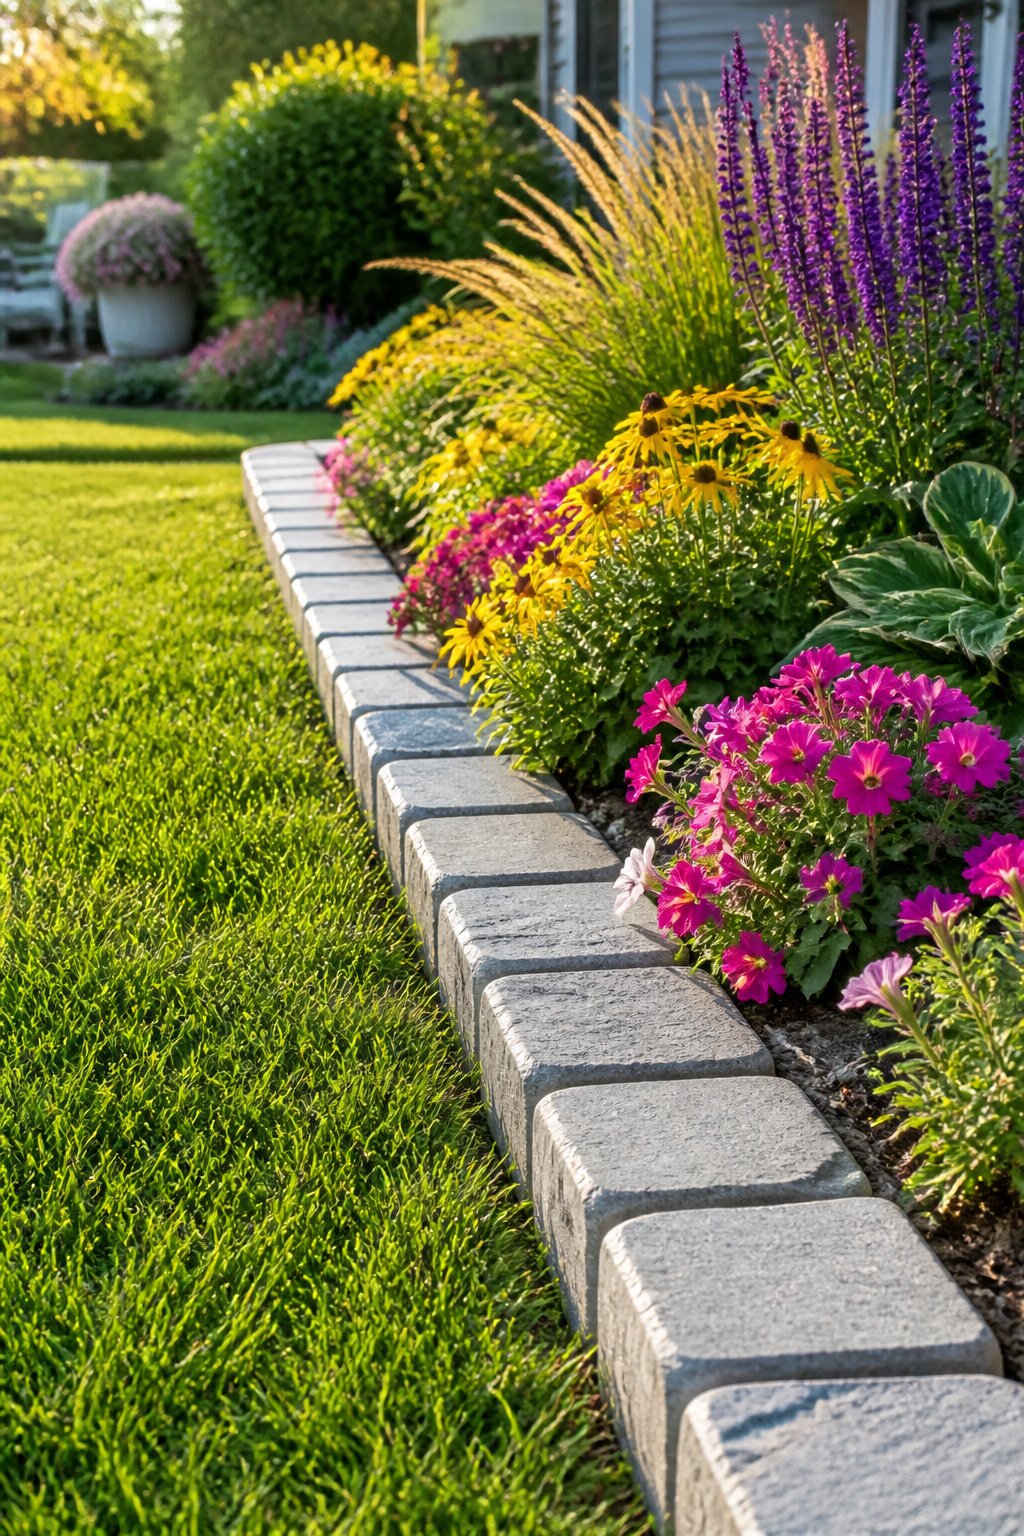
Stone blocks give a garden bed the clearest visual boundary of any material I looked at. The uniform size means you spend less time fussing with a level; set one block flat, and the next one has a surface to match. That repeating rhythm reads as intentional, not accidental, which is exactly what separates a planned border from something that just happened to end up there.
Concrete blocks with stone facing cut the weight and the bill without losing the look. I would skip anything too thin; a block that tips when the soil freezes behind it defeats the whole purpose. A depth of at least four inches sitting below the soil line keeps the row from walking sideways over a winter.
20. Shells
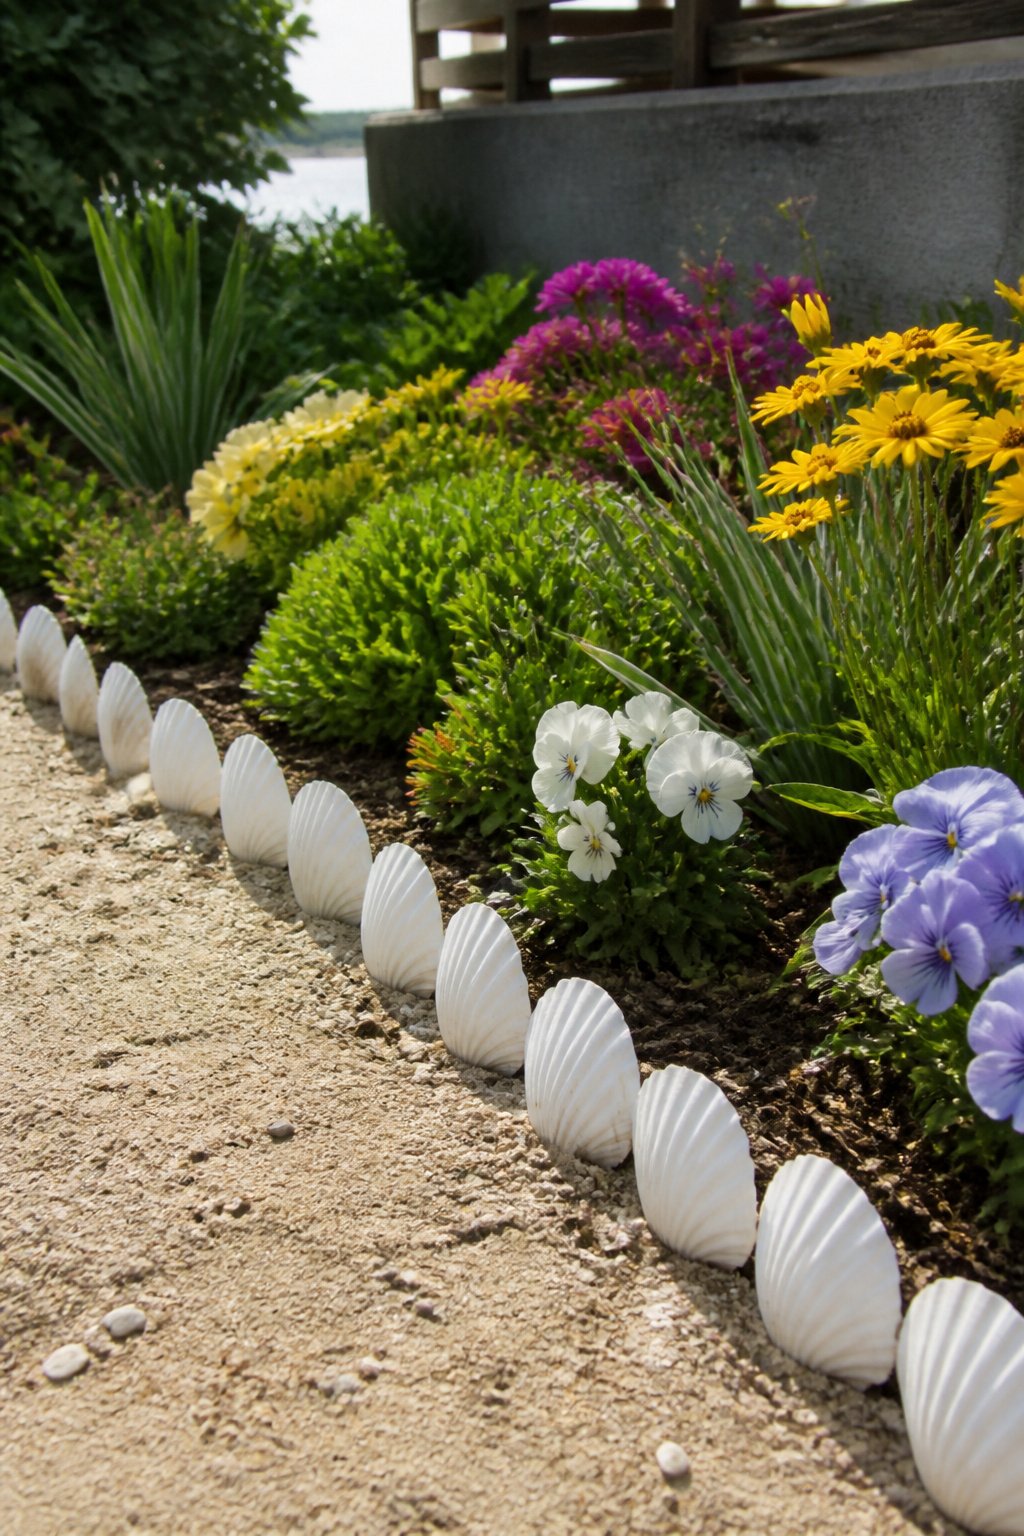
Oyster or scallop shells set on edge give a garden bed the immediate look of a coastal yard pulled straight from a beach town rental. The white catches whatever light filters through nearby trees and throws it back upward, which brightens a shady corner more than you’d expect from something so simple. I like the way a whelk shell edge catches morning sun; the narrow spirals almost glow against dark soil.
The catch is what happens after you walk on them. Shells crush underfoot, and that slow breakdown is not neutral. Over seasons the fragments work into the soil as lime, raising pH in a bed where acid-loving plants live; your blueberries or azaleas will sulk and yellow while the bed turns friendlier to lavender or clematis. Plan the placement for plants that want neutral to slightly sweet soil, or commit to monitoring pH and amending with sulfur when the numbers climb.
21. Pound-In Plastic Edging
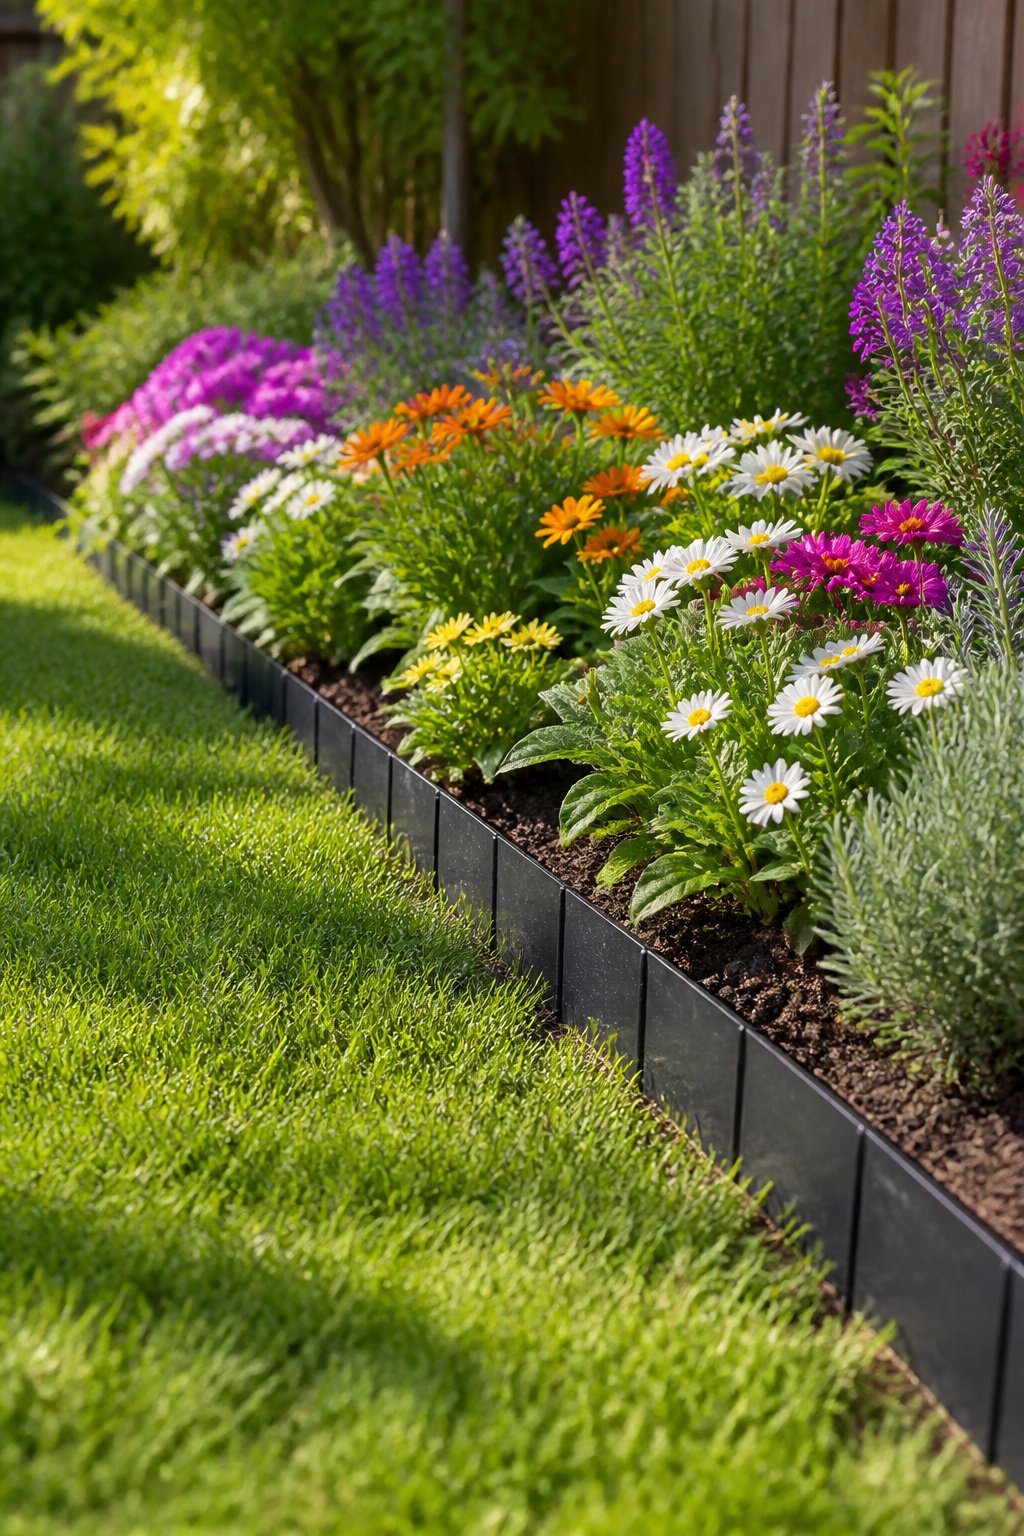
Pound-in plastic edging comes in short, rigid panels rather than a continuous roll, which means you can bend it around curves and sharp corners without fighting the material. Each piece carries its own anchoring spikes, and a rubber mallet drives them flush to the ground. No trench to dig makes this one of the faster installs for a Saturday morning.
The tradeoff is in visibility and strength both. The thin profile sinks lower than roll plastic, so the line stays cleaner, but grass runners face less of a wall. I found the panels lifted in frost-heaved soil after one winter, though once the ground thawed they tapped back in easily enough. Cold-climate gardeners should expect that check each spring.
22. Decorative Containers
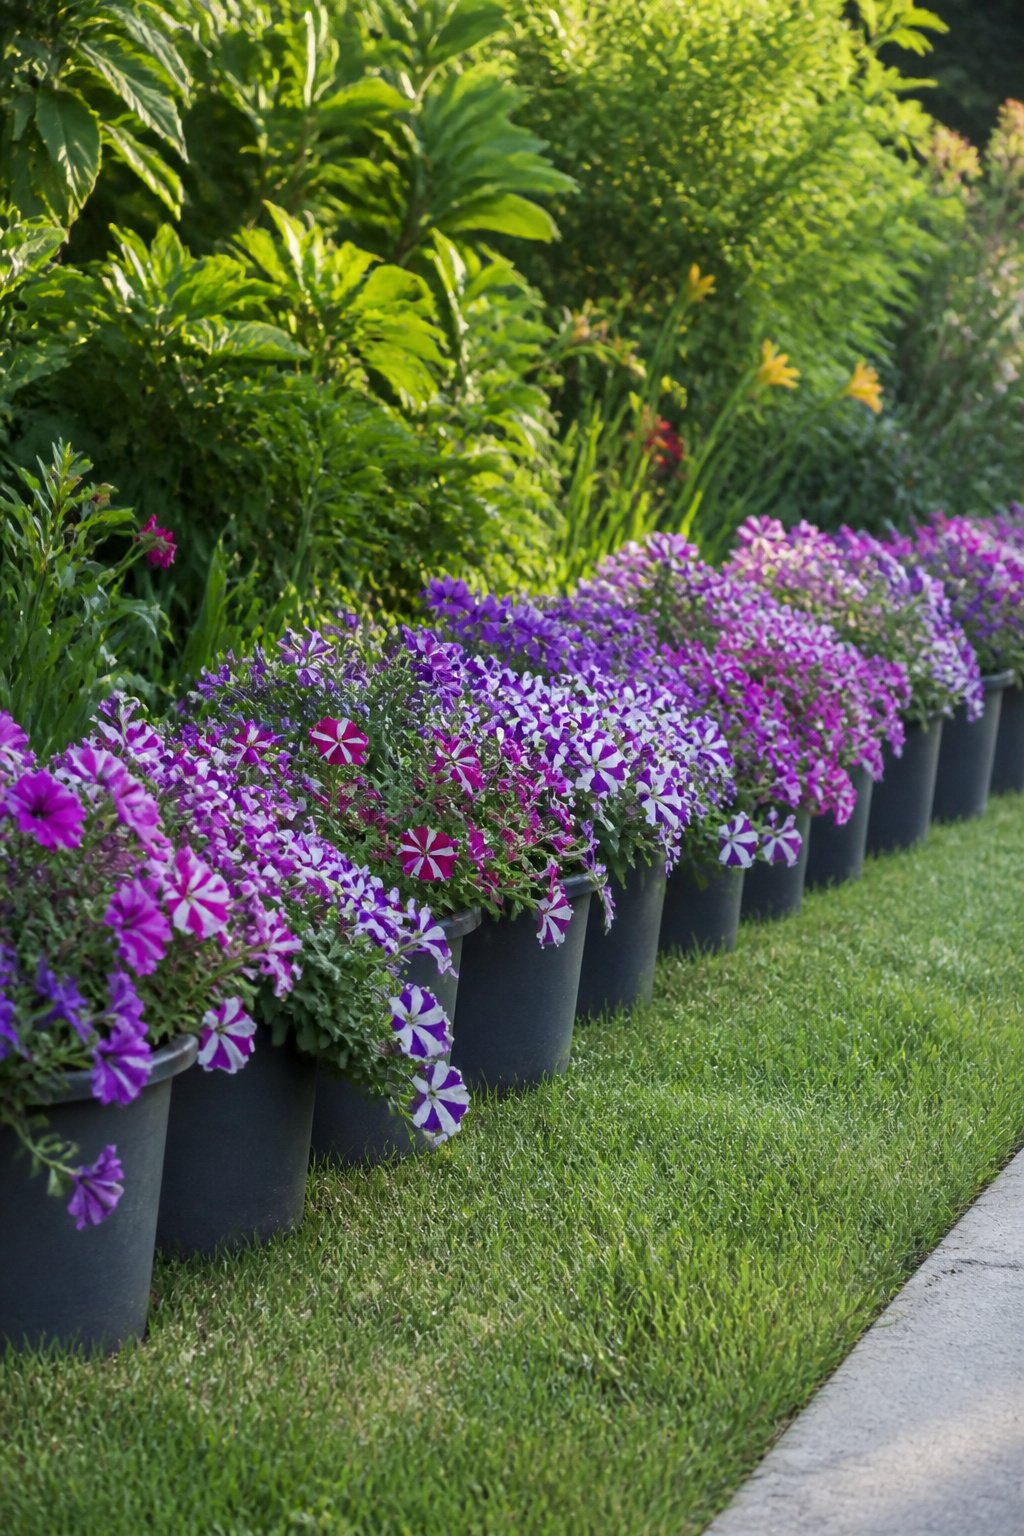
A row of matching pots can edge a bed as well as define one, and the whole arrangement lifts out of the way when you need to change it. I keep a set of black nursery pots in the garage for exactly this: lined up along my driveway bed in spring, they hold wave petunias while I dither over whether to commit to steel edging. Come July the petunias have trailed over the rims and the pots themselves have vanished into the planting, but the edge reads clean from the street.
Slope is where this fails. On even a gentle grade, pots tip toward the low side and the uphill half of the root ball dries out by noon. Hardscape or dead-level ground is the only place I’d trust them for more than a weekend. For that temporary driveway line, I sink each pot an inch into the mulch so they don’t skate around when the hose drags across them.
23. Cobbles
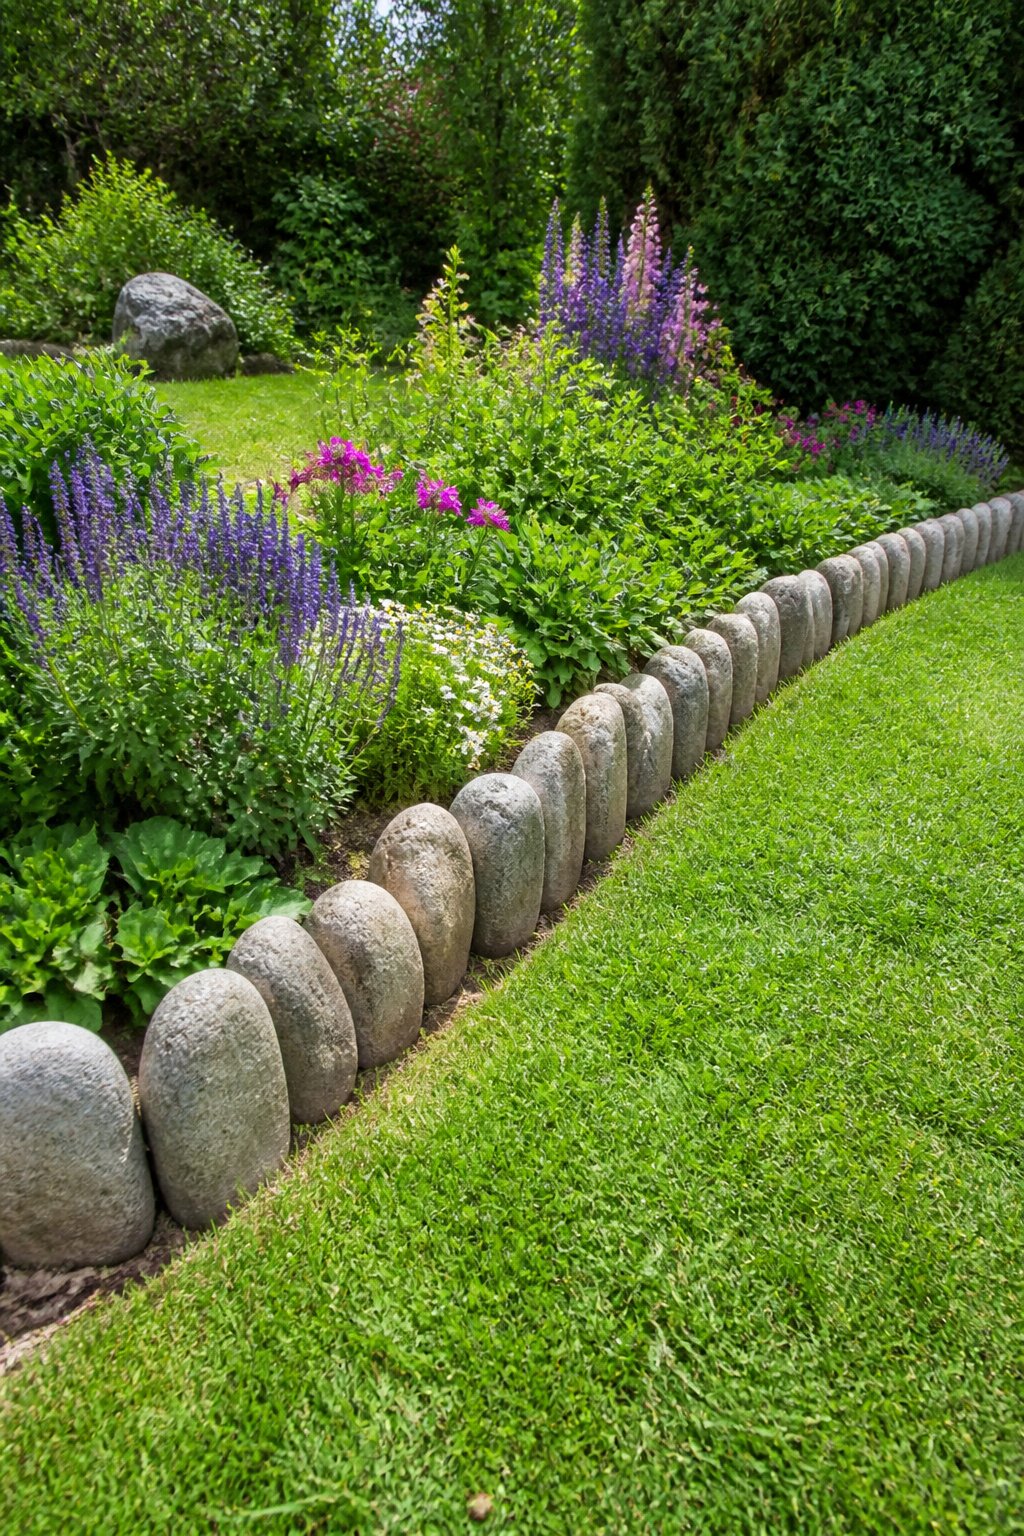
Rounded river stone or dressed granite set on edge gives a border that stays put under boots, wheels, and the occasional misplaced ladder. The weight alone keeps the line honest, and the gaps between stones let rainfall through instead of pooling. That same openness is the weakness: weeds root in the spaces, so the edge needs attention a few times a season.
Flat-laid cobbles flush with the lawn let you mow straight over the border, no string trimmer needed. The blade hits grit every pass, though, and the nicks add up faster than you’d think. I count that wear against the time saved and still come down on the side of standing them on end, where a few inches of vertical reveal holds bark or gravel in place and signals a deliberate boundary rather than a maintenance shortcut.
24. Hedging Plants
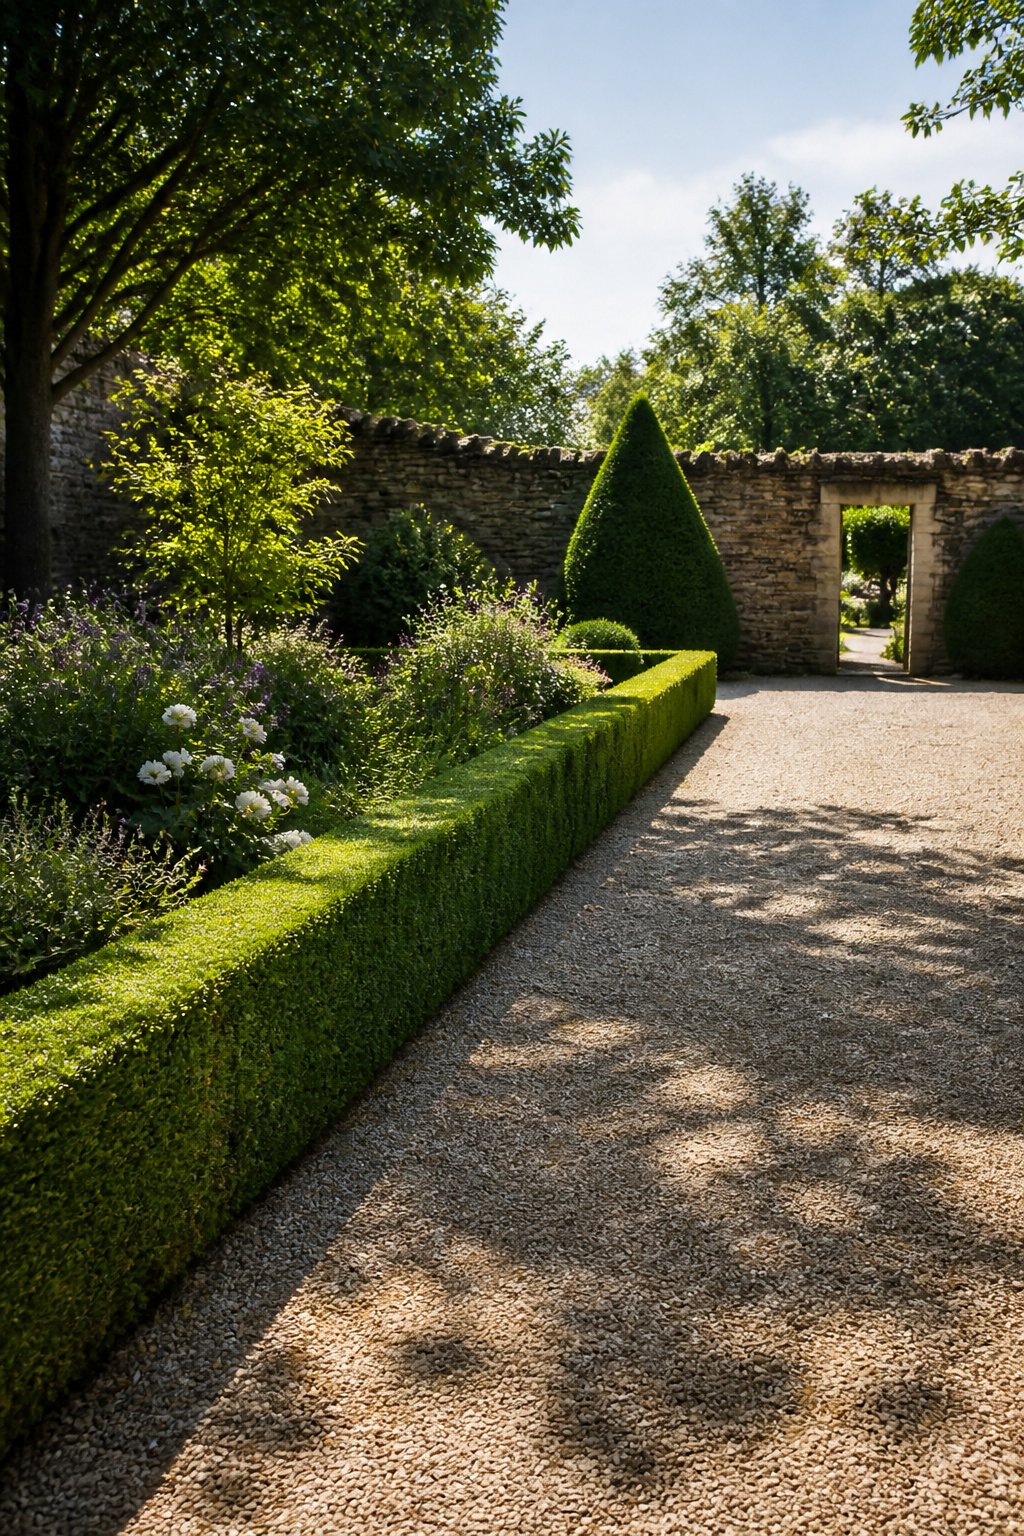
A living hedge gives you a border that changes with the seasons and can be clipped into whatever geometry suits the bed behind it. Boxwood, yew, and privet are the usual choices for a formal edge, though none of them look like much the first year. Plan on three to five years for small plants to fill in and knit together at the base.
That formal, sheared look takes work. Two to three passes with the trimmers per growing season keeps the faces flat and the top level, and skipping even one round lets the growth get away from you fast. Lavender or another informal flowering hedge eases the maintenance schedule, but the trade is real: you get color and bees, not the crisp architectural line that defines a bed so sharply you can measure it with a straightedge. For a small yard where every inch reads, that distinction matters more than it might in a larger garden.
25. Railroad Ties
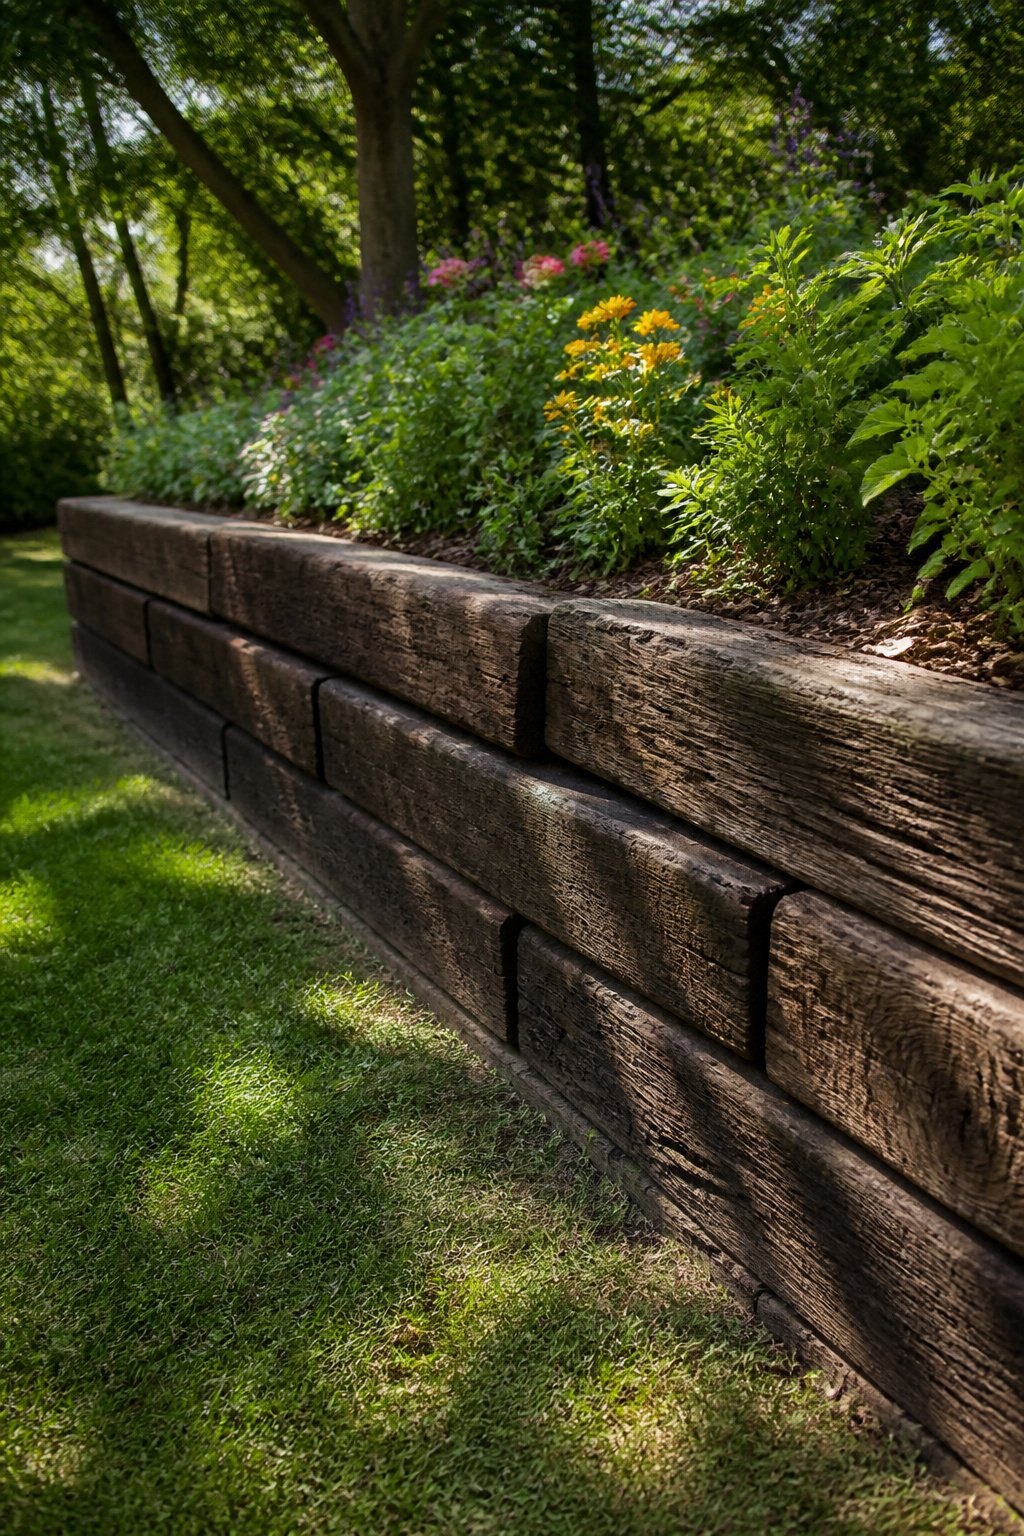
Railroad ties bring a weight and history to a yard that thinner materials never match. The old ones, saturated with creosote, still turn up at salvage yards and farm auctions, but most states now restrict them for any bed that will grow food because the treatment leaches into soil for years. Newer ties rely on less toxic preservatives, yet the EPA warning labels remain, so I would not use them around vegetables or anywhere a child plays in the dirt.
Their mass is the real advantage. Eight years ago I laid three ties in a shallow terrace down a slope in my backyard, stepping each one back six inches from the one below. No stakes, no rebar, no frost heave. They have not shifted perceptibly since, and that stability is rare in a material this cheap to source secondhand. The downside is the labor: a single dry old tie can run past two hundred pounds, and moving three of them solo meant a hand truck, a come-along, and a full Saturday. For a straight run or a simple corner they shape a garden bed with unmistakable presence, but curves fight the material, and the splinters from weathered grain go deep. Gloves are not optional.
26. Field Stones
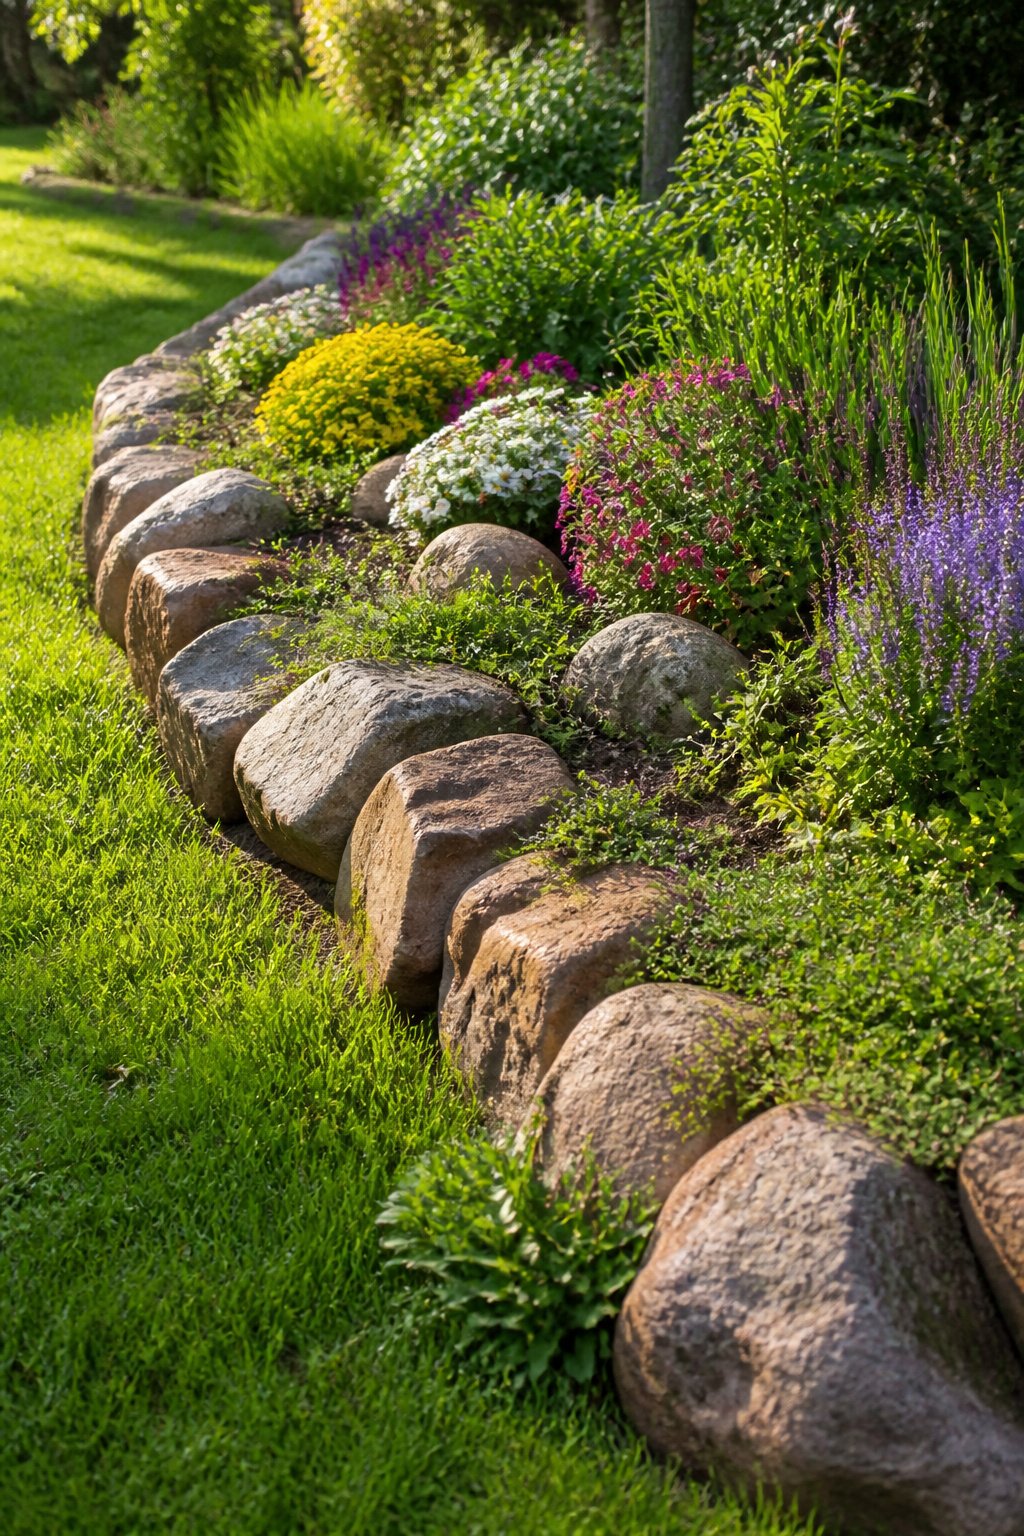
Field stones carry the same weathered look as the pastures they come from, which is exactly why they settle so naturally into cottage-style beds where nothing needs to match. The irregular shapes leave gaps between stones, and those gaps are useful: low things like thyme or alyssum can spill through and soften the line without anyone planning it.
You can collect your own from property lines or a friend’s farm, or buy them by the ton from a landscape yard. Larger, flatter stones stay put better than small round ones that shift every freeze-thaw cycle. Setting them two-thirds deep stabilizes the edge, but that means more digging than simply laying them on the surface, and the soil type in your yard decides whether that extra work is worth it. Sandy ground holds little; clay fights you on every stone. I have learned to test one spot with a single stone before committing to the full trench.
27. Faux Stone Edging
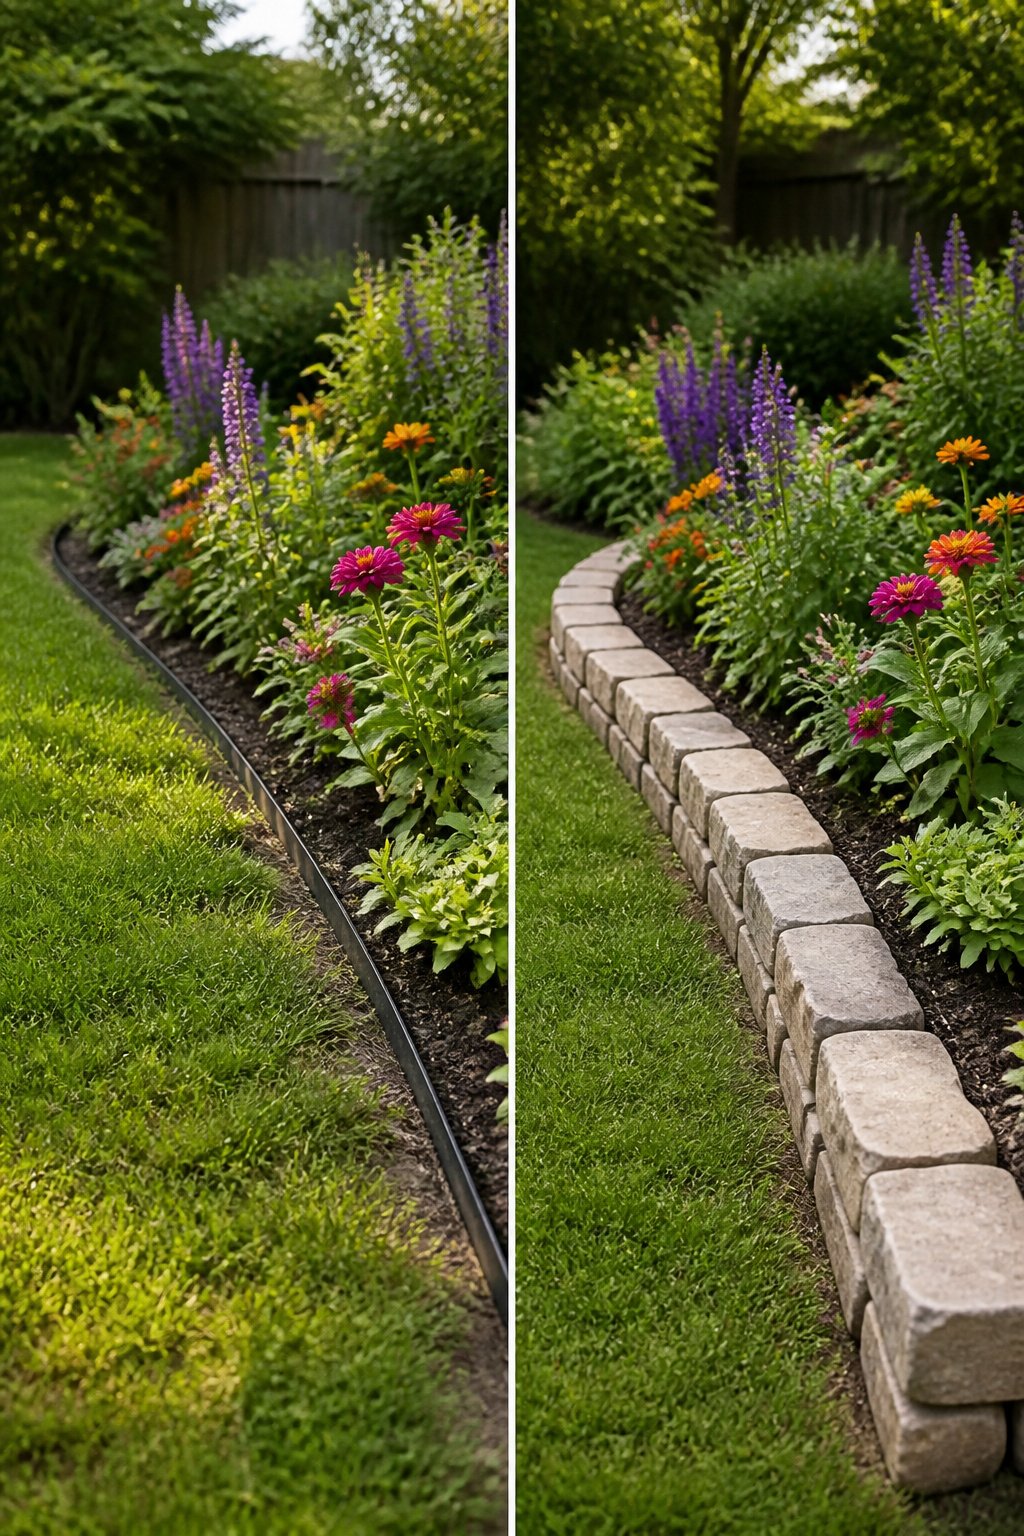
Faux stone edging sits in a strange middle ground where the goal is obvious but the result rarely fools anyone walking past. Cast concrete or resin gets molded and airbrushed into something meant to pass for limestone or granite, and from ten feet back on a cloudy day it sometimes manages. Up close the pattern repeats every eighteen inches or so, and the weight is wrong in your hands, light where stone should sit heavy.
The surface starts to smooth and chalk within three to four years of full sun, losing the rough texture that sold the illusion in the first place. Lawn chemicals and salt spray from winter road runoff speed that fading along, especially on the faces that catch overspray from sprinklers or the street. The color goes milky before it goes gray.
It costs less than real stone and installs without the lifting, which matters if you are working alone with a small patio and a weekend. The trade is accepting that this is clearly a manufactured product doing an impression, and planning to replace it sooner than the packaging implies. For a rental or a first border you are not sure you will keep, that math can work. For a long bed you walk past every morning, the repetition wears thin faster than the material does.
28. Reclaimed Materials
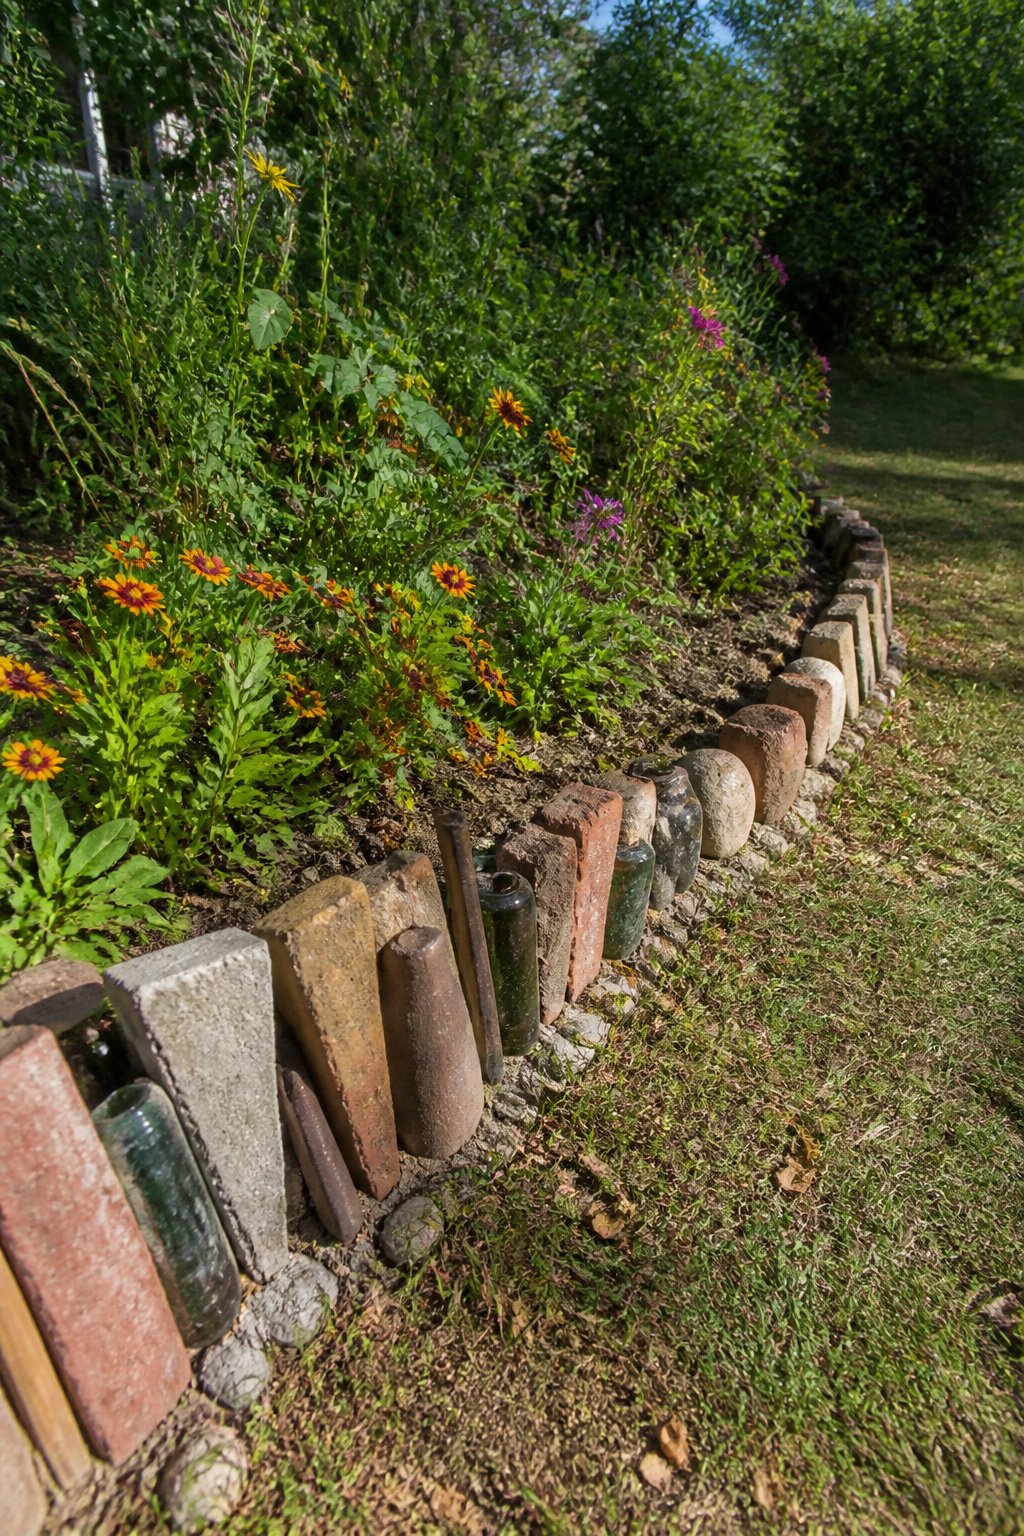
Old roof tiles, bottles, bicycle wheels, and broken concrete set on edge give a garden border story as much as structure. Each piece arrives with its own shape and weight, so fitting them means working one at a time instead of laying a uniform line. That irregularity is the point. A neighbor used yellow and green wine bottles neck-down along his herb bed, and the colors caught morning light like nothing store-bought would manage. I tried the same behind my own kitchen window. The bottles went in easily enough, angled slightly so rain would run off the rims, but three of them shattered the first season when I misjudged the mower’s turning radius. The remaining ones still edge that bed three years later, though I now keep a wider grass buffer than I thought I’d need. Broken concrete, what landscapers sometimes call urbanite, works on the same principle. Faces that were hidden in a patio show interesting aggregate or color once you flip a slab vertical. The labor is in the selection, not the installation. Heavy, awkward pieces that would cost money to haul away become free material if you know someone replacing a driveway or you watch neighborhood giveaway posts. The catch is time. Scavenging enough matching pieces for even a small bed border takes longer than buying lumber, and the result looks wrong if you rush it with mismatched colors or heights.
29. Mixed Materials
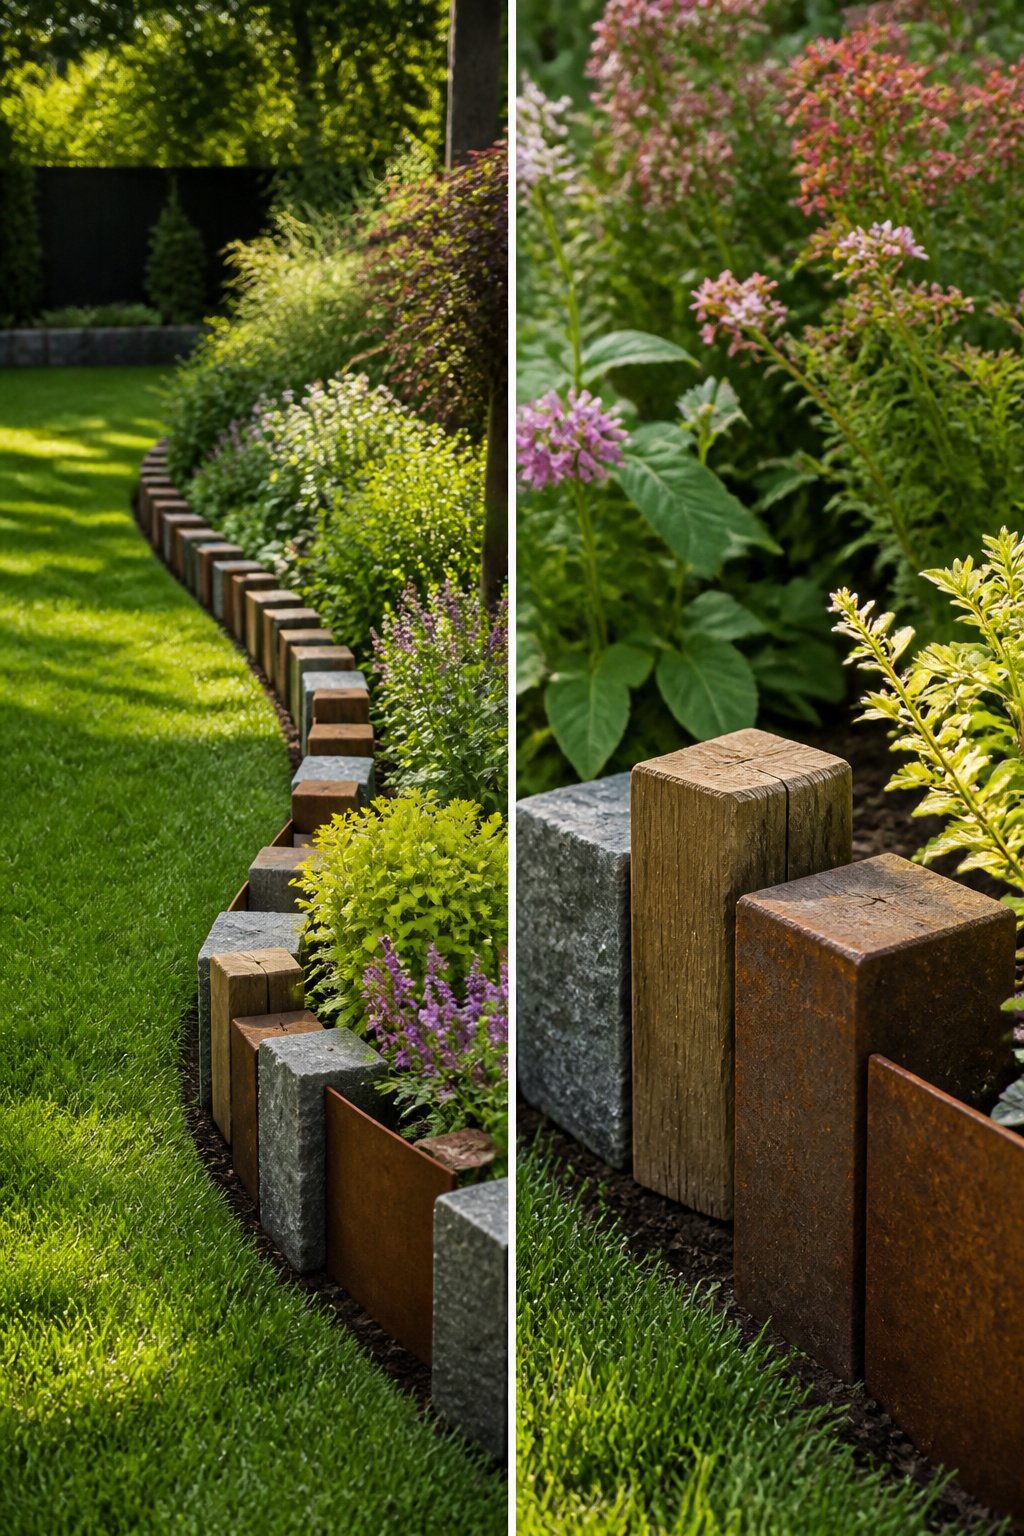
Stone against timber, steel against paver, brick against log round; the pairing itself is the feature. What separates a deliberate border from a yard that looks unfinished is rhythm, not randomness. Repeat the alternation at a set interval, two bricks then one round, or run a steel strip the full length and let stone butt against it at even stations. The eye reads pattern as intention.
I tried steel and limestone together once. One rainy season later, rust from the steel had stained the pale stone orange. The contrast I wanted became a smear. If you mix reactive metal with porous stone, keep a gap or seal the stone first, or choose a metal that stays bright, like aluminum, knowing it may shift in loose soil. Hardwood log rounds last longer than softwood, but any timber in ground contact eventually rots; plan the replacement into the design rather than fighting it.
Installation Basics
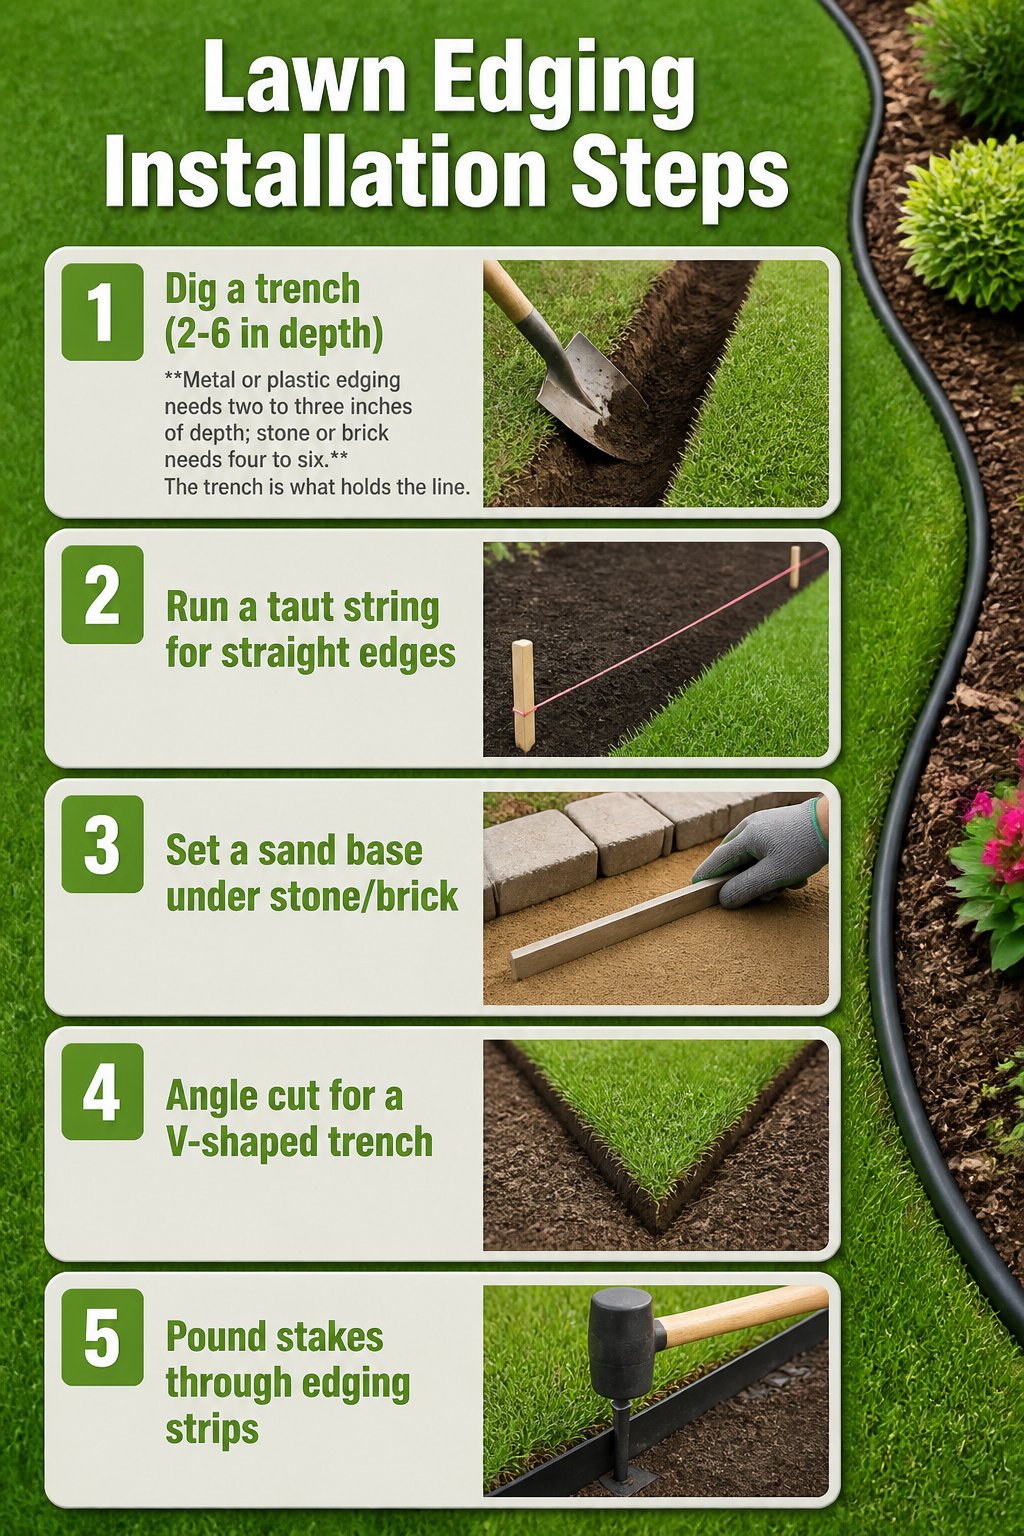
- Dig a trench first, whatever material you choose. Metal or plastic edging needs two to three inches of depth; stone or brick needs four to six. The trench is what holds the line.
- Run a taut string between stakes to keep straight edges true. For curves, lay a garden hose on the ground and cut along its edge; the hose bends the way a spade cannot guess.
- Set a sand base under brick or stone so the pieces level without rocking. The sand fills low spots you cannot see until the first piece goes in wrong.
- Angle the cut back toward the bed for a V-shaped trench edge with no material at all. The look is sharp at first, but grass creeps in within weeks and you will re-cut a few times each season.
- Pound stakes through metal edging strips to lock them in place. Recycled plastic works the same way and takes a rubber mallet instead of a hammer, which keeps the rim from cracking.
Maintenance by Material
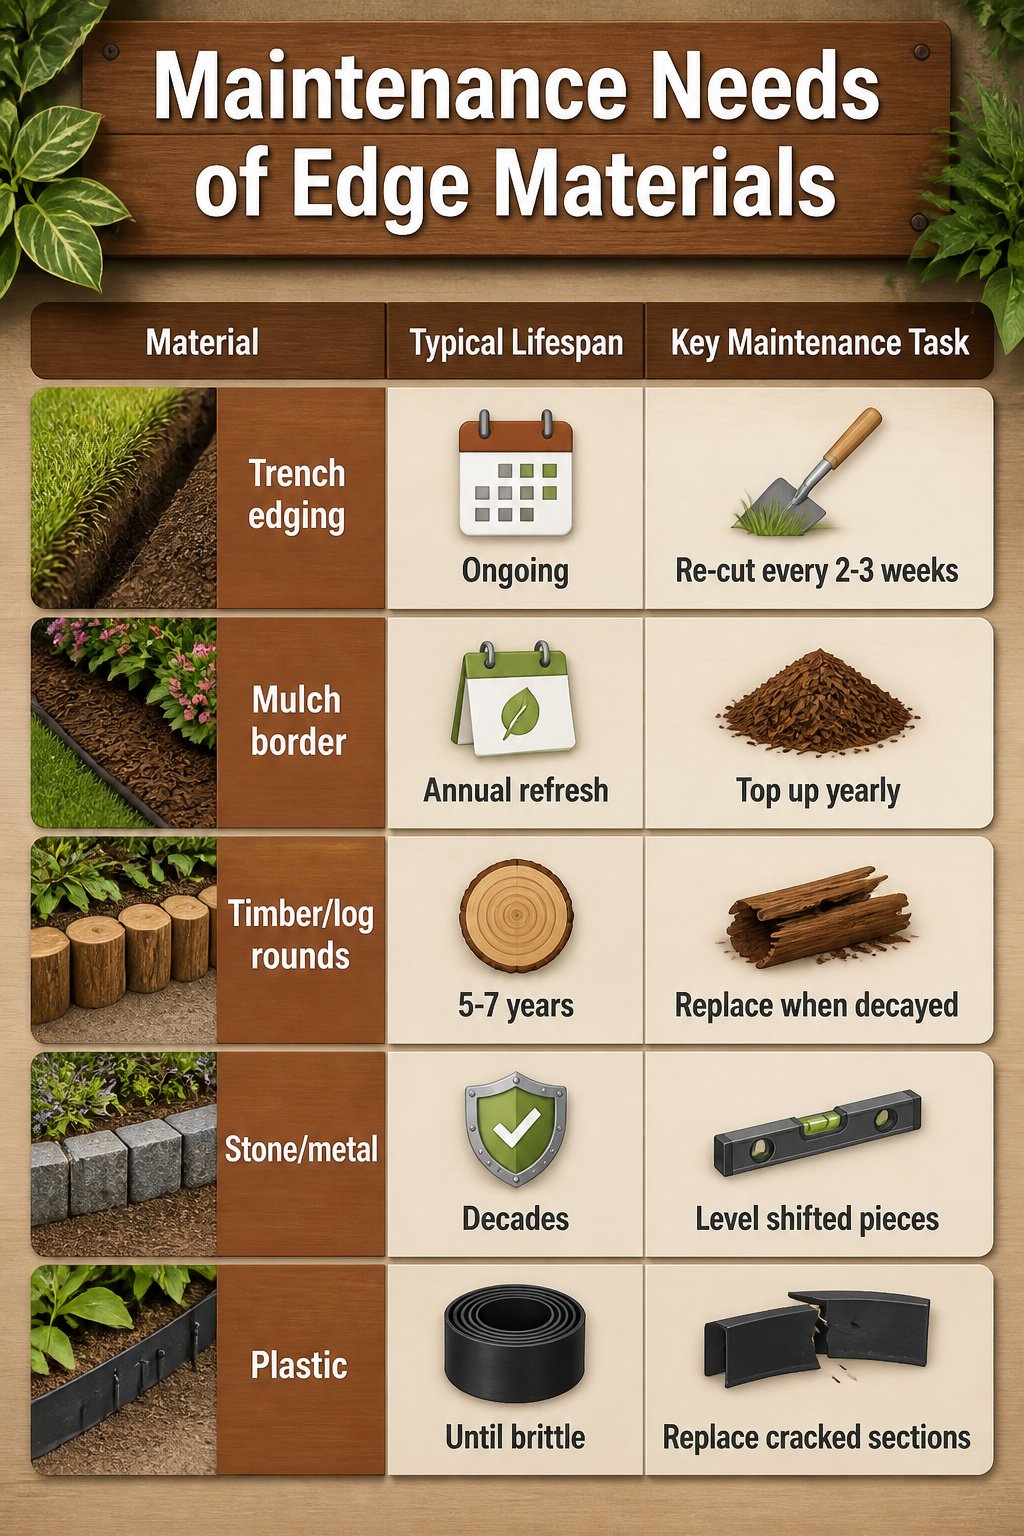
Choosing an edging material means signing up for a maintenance schedule you can actually keep. Trench edging demands the most hands-on time; without a physical barrier, grass creeps back in and the line softens within weeks. Re-cutting every two to three weeks through peak growth is what keeps it crisp. Mulch borders sit at the other end of the effort spectrum day-to-day, but they still need an annual top-up to hold their depth and color.
Wood looks warm and natural the season you put it in, but pressure-treated timber and log rounds both surrender to decay. Five to seven years is the realistic replacement window, sooner if your soil stays wet. Stone and metal last decades, which sounds like freedom until you notice the frost heave or the foot traffic has knocked things askew. Leveling stones back into place becomes the task, not replacing them. Plastic edging carries its own quiet expiration date: the rolls go brittle, crack at the bends, and split where they meet winter cold.
| Material | Typical Lifespan | Key Maintenance Task |
|---|---|---|
| Trench edging | Ongoing | Re-cut every 2–3 weeks in peak growth |
| Mulch border | Annual refresh | Top up yearly |
| Timber / log rounds | 5–7 years | Replace when decayed |
| Stone / metal | Decades | Level shifted pieces |
| Plastic | Until brittle | Replace cracked sections |
Cost and Budget
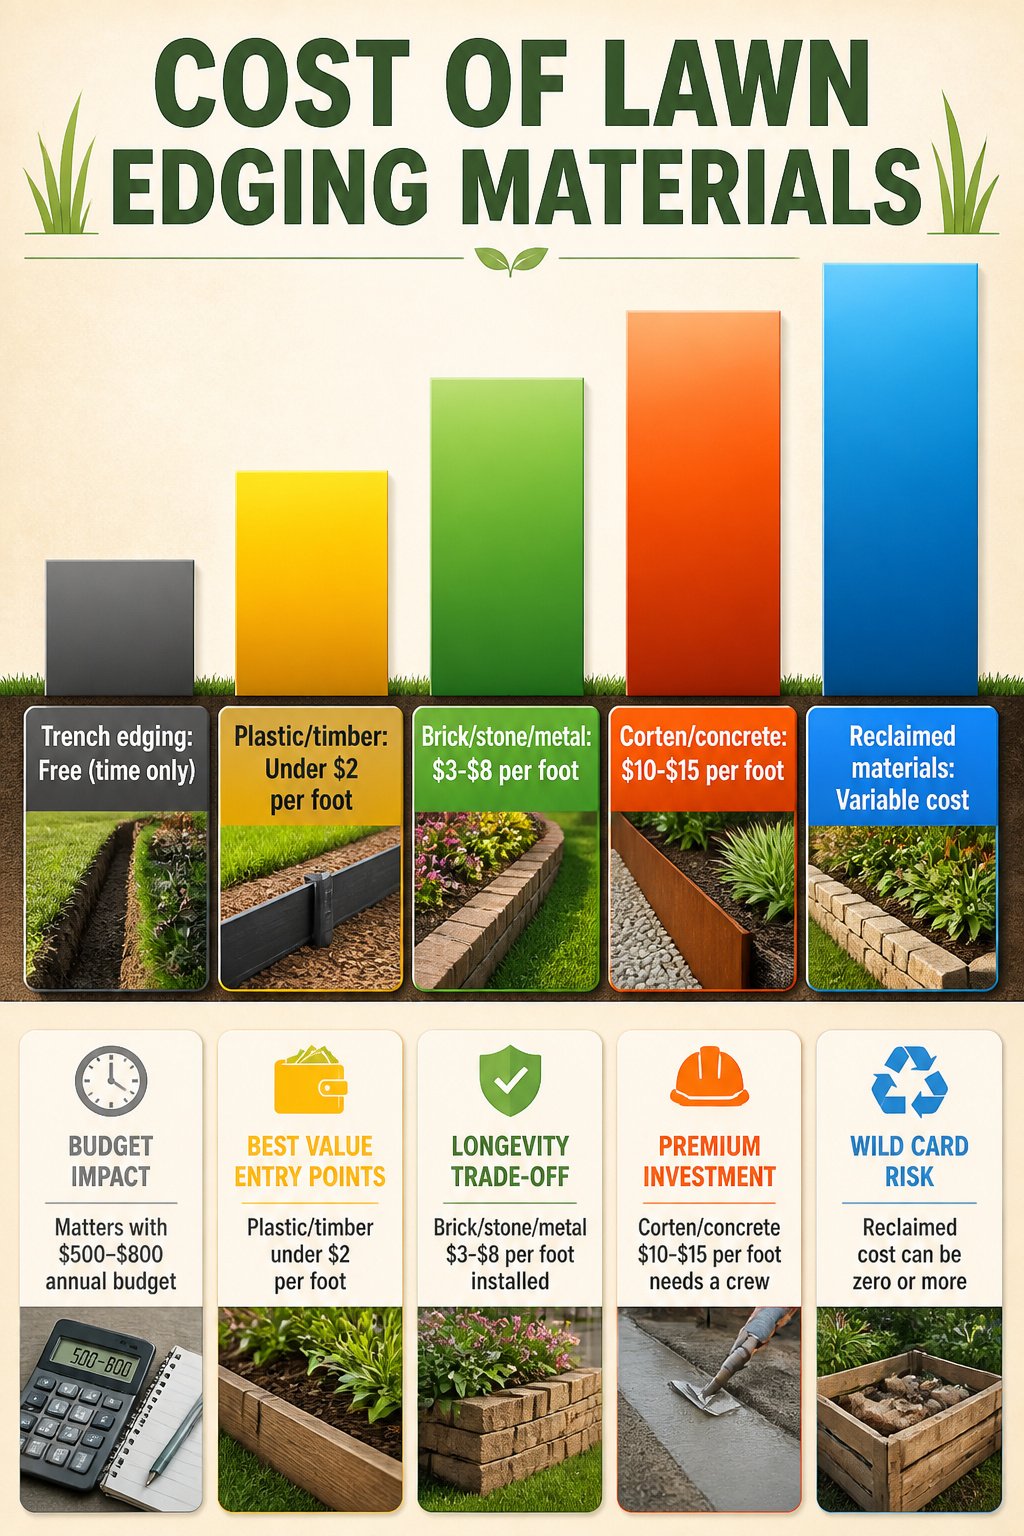
Trench edging and a simple mulch border cost nothing but time, which matters when your annual garden budget sits around $500–$800. Recycled plastic and timber both run under $2 per linear foot, making them the easiest entry points for a first edging project. Brick, stone, and metal move up to $3–$8 per foot installed, a jump that pays off in longevity but stings if you are measuring a long bed line. Corten steel and poured concrete top the range at $10–$15 per foot; poured concrete in particular is not a weekend job and needs a crew. Reclaimed materials are the wild card. Collect your own brick or stone and the price is zero. Buy from architectural salvage and you can end up spending more than new. I would start by walking the property with a tape measure and a calculator before falling in love with any single material.
What I Got Wrong
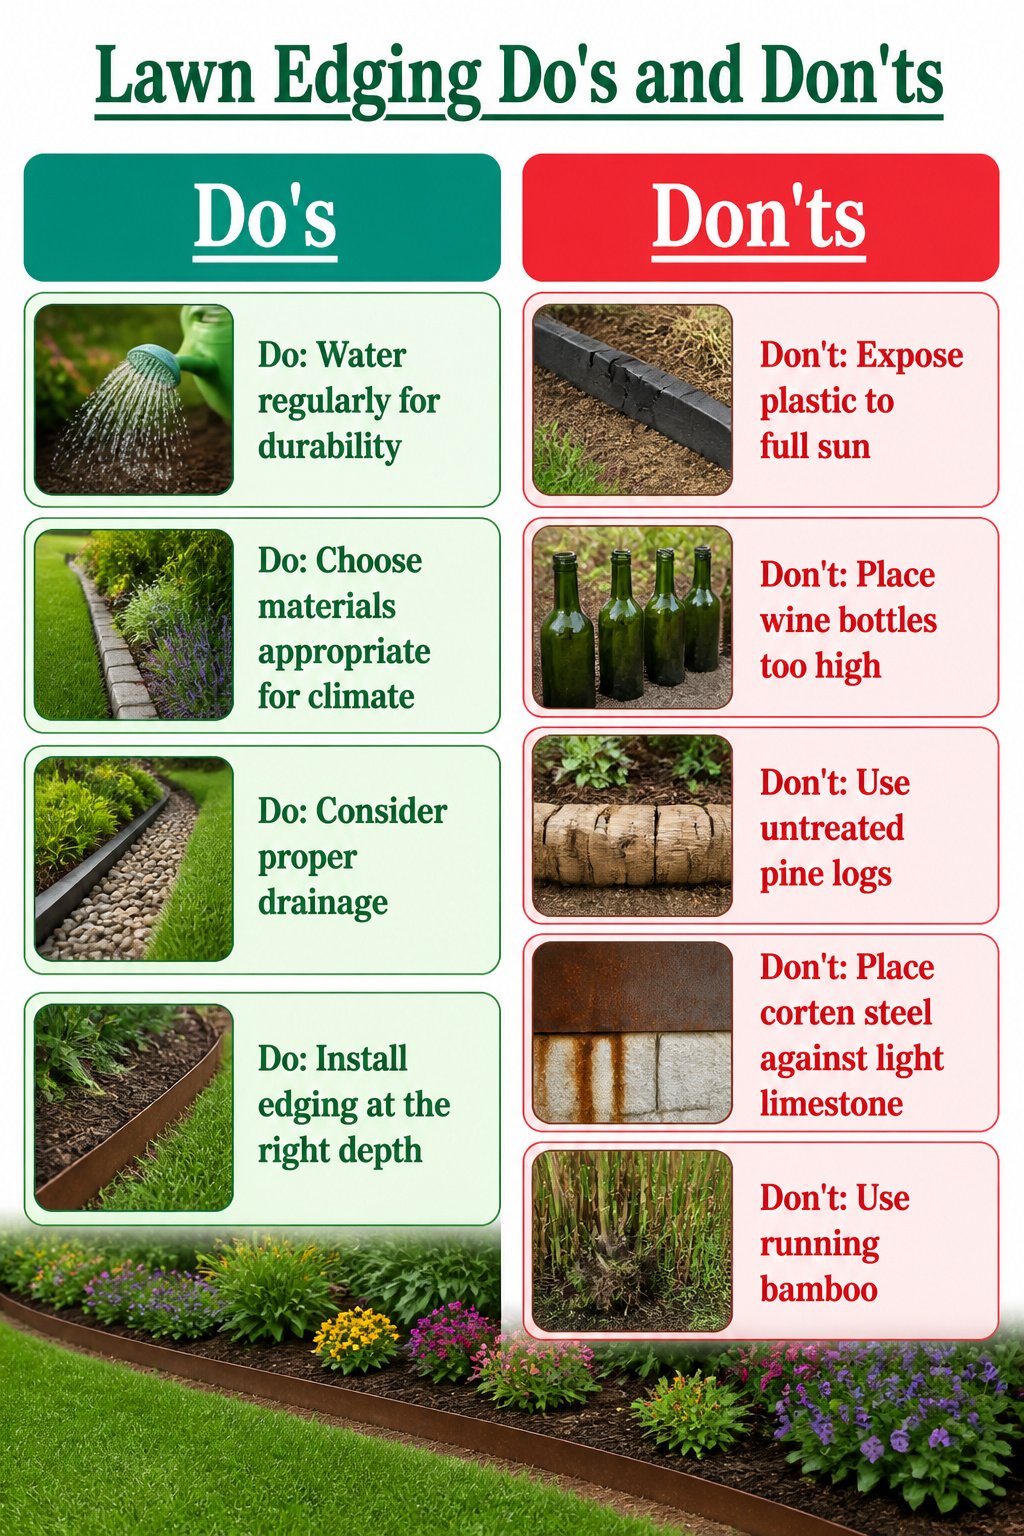
Some mistakes in edging only show up after the second or third season, when the money and hours are already gone. Plastic edging left in full sun turns brittle and cracks within three years, so the clean line you paid for becomes a row of green toothpicks. Wine bottles set with their necks too high look charming until the mower catches one and sprays glass across the bed. Untreated pine logs seemed rustic and cheap, but carpenter ants hollowed mine out from the inside, and the border collapsed the summer I needed it to hold. Corten steel against light limestone was the costliest error: the rust runoff stained the stone permanently, and no cleaner touched it. Running bamboo was the only living edge I tried, and it took two full seasons of digging rhizomes to get it out of the lawn.
Frequently Asked Questions
What is the easiest edging to install?
Pound-in plastic edging is the fastest to put in place because each short panel carries its own anchoring spikes; a rubber mallet drives them flush to the ground with no trench required. Recycled rubber edging also bends around curves without cutting, making it practical for awkward corners. Both beat stone or timber on speed and solo effort.
How do I maintain my garden edging?
Re-cut trench edges a few times per season before grass creeps back in, and top up gravel or pebble borders every year or two as stones scatter and settle. Mulch borders need fresh material once or twice a year and some grass pulling where runners sneak underneath. Each material has its own rhythm, but none of them are zero-maintenance.
What materials are best for garden edging?
Brick, natural stone, metal, timber, plastic, and concrete all have solid roles depending on budget and look. Brick and stone last decades; metal disappears visually; timber and plastic cost less upfront; concrete is the most permanent but cracks in freeze-thaw climates. Match the material to how formal you want the line and how much upkeep you will actually do.